Friday, August 5, 2016

Zentangle - Self Study course

The first time I heard the word "Zentangle", I was curious and wanted to find out more.  For my birthday this year, I asked for this book, which my DS so kindly gave me.  It is a 6 week course in this intriguing technique.  So far I'm on Day 3 which is going very well.   This is not only relaxing and creative, but helps me to open my mind to the art and to keeping a daily art journal as I did years ago (almost 20, to be exact) when I attended City and Guilds-Patchwork and Quilting.   The tile I created today looks like a cushion to me.
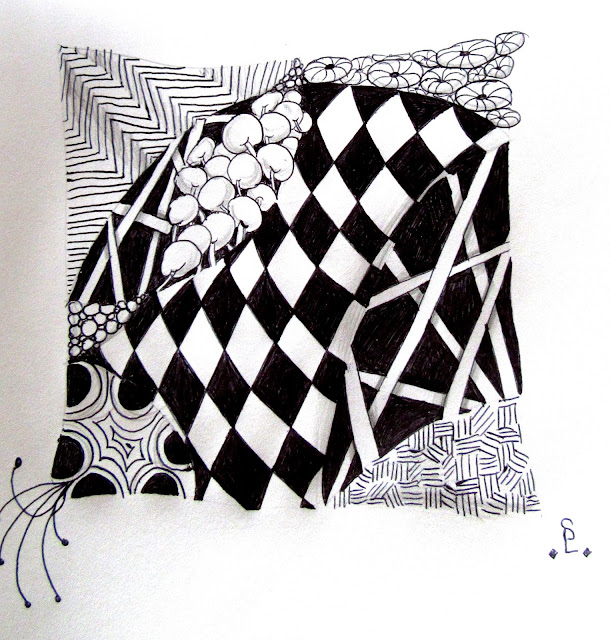
Day 3
Honestly, I think anyone can do this method even though it looks complicated.  The book takes it one day at a time and briefly describes the principles of art like shading which can give depth and dimension.   Elaborating on some of the designs can lead to some awesome ideas for patterns and quilting.    The basic concept is to fill every space of the tile with designs using marks, lines, shading, shapes, etc...
Day 1

Day 2
 Each day is a new addition to the marks and you make a new tile everyday, but I have not looked ahead to the next day as I don't want to have a preconception of what is to come, or psyching myself out by thinking "I can't possibly do that", and ultimately giving up.  You can, however, look back on the designs learned from past days to add to the current day's tile.  It's actually encouraged, and I can see that it adds so much to the finished tile.

 Being a quilter and seeing repetitive patterns over and over can be boring. I find whole cloth quilts beautiful in their own right, but again, not my type.   Color, texture, and quilting stitches can break up the monotony, but it doesn't change the repetitiveness.  Sometimes I finish a quilt and am disappointed by it for this reason.  This is why I don't like following a pattern verbatim.  Or I will put a spin on the design or do free hand quilting in my own designs.    The Zentangle method can work on quilt patterns and stitching to fill spaces and bring interest.   I want to test this out on a negative space quilt I have waiting for design inspiration, so this must be what I'm waiting for.  Using the thread in the machine, I will "draw" out my Zentangles to fill the spaces.  
For now, it's break time for my brain and I need to get dinner on.  I will get back to this in the coming days.

Monday, August 1, 2016

Thread Painting Study


Today I am working on an at home thread class project.  It happens to be on thread painting.  The technique uses water soluble medium called "Dissolve 4x Stabilizer" so that you can draw your design onto it, sew over it and dissolve the medium completely with water.  The class was designed by Superior Threads with designer Nancy Prince.  She is an award winning quilt artist from Florida.   The threads used are 100% Trilobal Polyester fiber. Go here to see these threads and brands.  The threads are shiny and they lay very flat.  If you are going for this look, they're great.  For this beginner thread class, they do work very well.   The background fabric I used here is hand dyed cotton.   The background, Dissolve medium and stabilizer are layered in a hoop and sewn over the lines drawn.  Drop the feed dogs, loosen the tension and use a free motion embroidery foot to work your design.  Change colored thread as needed for the top.  The bobbin thread I used is a neutral color light weight polyester "Bottom Line" thread by Superior Threads.  


This is just a small piece that will get cut down and sewn into a postcard.   But, I am finding this technique a little awkward and probably will not use the soluble again.   
           Finished Post Card
I like variegated cotton threads in a couple different thicknesses that tend to give some dimension, depth and texture.
 Couching down very thick threads, trims, yarns, and even metal threads add interest to designs.  When I went on retreat 5 years ago in Cumbria, I briefly mentioned this class I took with designer Kate Dowty.   This was an enjoyable liberating class and she was an exceptional teacher.  See her "Pebble Splash" class example here.   As soon as she described her inspiration for this piece, I knew I wanted to put my own view on it.  The representation of pebbles, water, sand, and marsh is represented in movement across the three panels horizontally.  

The elements are appliqued using fusible web and sewn onto wadding/batting backed panels and thread painted around each pebble, adding lines of quilting to show movement like water, waves, bubbles for texture, etc...  then add the backing fabric to each panel and sew around close to the edges.  I used several different fabrics for this from quilting cottons, to velvet and satin.  


The backing is layered right sides together and sewn all around leaving the tops of each panel open.  Make a few clips in the curves so they will turn easily, turn the pieces right side out.  The tops can be finished simply by turning in the edges and whip stitched closed, however, I wanted some drama to the tops, so I made a stiff velvet cap for each panel.  The beading is the final elements to be added to the design and some of the beads are sewn trailing off the edges.  I am very happy with this piece and want to do a second design using a different colorway.   ;o)

Catherine's Wheel

 I posted December 17, 2020 about making an ornament which is called prairie wheel (USA) or Catherine's Wheel (UK).  The latter being of...