Sunday, September 27, 2026

Journal mini quilts


                                                                       "Beach Glass mini"

Journal quilts are those works of art that are made from a sketch or idea.  I like to make minis so I can try out techniques or practice a quilting design or use non cotton fabric.   Many of my sketch books are not yet realized pieces of art, they are just concepts.  Some are still ideas floating in my mind.  
To me, the idea to make a quilt "pop", has to do with texture and illusion just as much as color choices. 
Beach glass mini was one of these techniques that is simple enough, but can look effective by making it look like a mosaic of animals, landscapes, flowers, or whatever you want using a basic sketch and filing in spaces with bits leaving the background exposed.  In the photo below, I used paint sticks to make a watery background and adding the pebbles.  


                                                                     "Velvety Chocolate"

Velvety chocolate was made by taking black velvet and immersing it in bleach.  This process took some time to discharge.  I cut a good hunk from it and ruched it all over leaving some spaces.  It was completely random.  I sewed it onto a foundation cotton and made random seed stitches.  It's not quilted using layers with batting in a traditional sense, but it is fused onto rigid fusible and finished.  

                                                                    "In the Woods"
In the woods is a piece I was experimenting for depth.  I wanted the beautiful fall colors to be evident and the twiggy trees to be forefront.  In the way, so you are wanting to see beyond them.  I cut up little bits of color scrap and sprinkled them in areas on a foundation or background fabric, not really placing them, just letting them land where they may.  I used organza on top and thread painted all around.  The twiggy trees were added last.  My DH loves birds, so I added a few birds by using pigma pen and thread.  Finished as a postcard.  

                                                                     Close-up of the birds 


                                                                  "Dunollie Castle, Scotland"
While on holiday to Scotland, I sketched this castle and later interpreted it into this mini quilt.  I used paint to make shadows in the doorway and windows as well as the Scottish flag.  I had so much fun adding to this mini and finding the right rock-like commercial fabric to use for the wall and castle.  
                                                     "Cape Blanco Lighthouse"  Oregon Coast
This was sketched while on holiday to the Oregon coast.  The tree was bent from the winds.  I took some liberties in interpretation and used pigma pens to make shadows and lines to make it look like a drawing.  I used long seed stitches for the grass and making rouched leaves on the tree.  
                                                                           "Thread Study"
This mini was a study in thread painting.  I drew a simple drawing onto a product that dissolves in water leaving the stitching on the background.  The product was just OK for me.  Easy but messy and if you're going to paint with inks or paintsticks you have to do it after all the dissolveable is removed.  Making it difficult to paint around the stitching.  Maybe I could experiment with it more to find a better process, but really dissolvable is good for embroidery or adding an element after the background is established.  If you've had better success, please comment below as I would love to hear about it.   This was finished as a post card.  
                                                        "Titlow beach"  near Tacoma, WA
My DS and DH scuba dove the Titlow beach area in 1999.  I loved the landscape and sketched out a boat with some broken pylons left abandoned as well as the Cascades in the background.  It's just my interpretation of this area and not exactly depicted.  Again, I used thread painting and tried adding shading lines with the threads.  I also wanted it to look like a painting, not a quilt, so I offset the border and framed it in black to look like a mat and frame.  

                                                                      "Shore Things"
This one is heavily thread painted with some uncommon elements added to give meaning and depth.  The words are cut from a magazine and stitched over to hold in place.  Top left says, "Shore Things" and "In The Hunt".  The bottom left corner is actually stitched through each word which says, "Amazing how many treasures can be held in your hand".  There are beads, canvas, paint and on the right side I have written out the tongue twister, "she sells seashells by the seashore".  

                                                                           "Yours Always"
This one was created as a postcard with a message written with pigma pen over a photo printed on fabric.  I used paint sticks, large seed stitches and finished it without a stiff backing.  

                                                                    "Blue Valentine"
Similar to the previous postcard, Blue Valentine was created using rubber stamp and ink, paintstick, pigma pen, applique and large stitches.  This one was featured in a magazine that had a call out for postcard challenges. 
                                                                       "Stepping Stone"
                                                                          "Underwater"
                                                                        "Holland landscape"
                                                                     "Holland landscape"
                                                                            "Free Spirit"
Art quilting has been my favorite creative way to try out techniques or challenges.  I don't like following a pattern, but I have made some quilts using a pattern from start to finish.  Using a journal or sketchbook can really spark inspiration.  


Saturday, July 25, 2026

Stick a Needle in your Eye or Runs with Scissors

 What are these old sayings?  Stick a needle in your eye?  Ooouch!  I take it as your needles need a place to be (and not in the eye).  A needle book.  So, you would think, "Ok, I could use ONE".  How about 8+?  Yes, for me it's 8 and I could make more.

It all started back in 1999 when the quilt guild I was in did a program on needle books.  We made 1 and I filled it imediately. Back then I was still hand quilting and really liked having a place to put these little delicate needles.  I wanted another book to put my embroidery needles in to keep them separate.  Then, tapestry needles needed a place.  My blunt needles for crochet were getting lost in a drawer, so I made a book with a pocket to hold a package of them.  Fast forward a little and now I have made one for my sewing machine needles.  And have accumulated 8 of these little books.  They are all different in size, design, and capacity.  


You would think, "I don't care, I'll just buy another pack if they get lost".  Well, I have to say over the years it may just be a few dollars for a pack of needles, but over time that adds up to a lot.  Like all my tools, I want to take good care of them for as long as I can.  I've had to replace old rusty dull needles, warped cutting mats, broken and chipped rotary cutter rulers, rotary cutters (and of course, blades), embroidery hoops, and scissors.  Yes, scissors!  

Running with Scissors?  Who came up with this one?  I personally have scissors, scissors, and scissors everywhere in my house. Not just in 2 big containers in my sewing room, but a coffee can in the garage, a junk drawer in my kitchen, a drawer in my bathroom, a small bin in my laundry room, a knife drawer in the kitchen, I said kitchen once, but nonetheless, it's two drawers.  Possibly making certain anyone who NEEDS a pair of crappy scissors will find these spread out all over and NOT grab my precious sewing scissors!  THE sacred rule of sewists everywhere, NOT TO BE USED FOR PAPER!   I bought a set (yes, set.  Not one, but two in differing sizes) of expensive scissors and tried getting them professionally sharpened.  The sharnpenig was $8 per pair and thought it would be a good thing to extend their life.  Of course, I was expecting YEARS of extended life!  That didn't happen, and I would say after a few months of use, they are back to being dull.  Not just a little dull, but hard to cut through the thinnest of fabric.  Dare I say this, I tried cutting paper with them.  Shocker, they didn't cut that well. My DH, bless him, says "just buy a new pair, it's OK you will use them".  I laughed, then cried, then got a little angry at the thought about buying MORE scissors!  Really?  I maybe have to realize that scissors today are not going to last decades and decades like Grandmother's scissors.   I am a licensed hairdresser and still have my hair scissors from college (45 years ago) and they are still sharp, very sharp, I've cut myself sharp.  They are "ice tempered" which means they go through a process of sub-zero temperatures to maximize blade hardness, edge retention, and durability.  Maybe I will buy a pair just to use in my sewing room?  Might be worth a try.  I can let you know, or not....could be the best kept secret?  

Wednesday, March 18, 2026

Baskets - Contemporary Vessels

 Baskets to hold all sorts of things and everyday use.  I love them in all shapes and sizes.  Most baskets for everyday use are the common rattan or willow type commercially made for use.  Quilters make rope bowls which are popular at craft booths.  But, what about the textile artist who creates art using basketry techniques out of all sorts of fibers, found items, discarded fibers and embellishments like beads, cork, bottle caps, twigs, and twisted paper.  They are using basketry construction, but it now becomes a contemporary vessel.  

I find this art form intriguing and makes me want to learn more about it.  About 14 years ago, I made a textile bowl using metallic threads and a stiff pelon to form the bowl.  It was a learning experience and after making that one piece, I never made another.  Not because I didn't like it, I actually love it.  So, maybe it's time for me to revisit some of the things I've made and learned on my journey but exploring the textiles or found objects to construct them.  

First steps to my creation will be to sketch some vessel shapes using pencils adding some texture and color just to see what direction I may want to go.  Acquiring found items and textiles to add by stitch, glues, wires, etc... I want to experiment with paint, stamping, or dying as well as knotting, stripping, and burning.  There are limitless possibilities and making samples are a valuable process.  However, I like creating as I go being serendipitous with fast decision making.  

Now to make time to put these creative thoughts into actions.  This is the most important thing to do even if it's only 30 minutes at a time.  


Saturday, March 7, 2026

Challenge = Growth

There's so many challenges in quilting from perfecting techniques, exploring color combinations, learning from mistakes, using materials on hand, percision piecing, adding perspective to designs, and on and on...but, the best take away from challenging myself is learning new things all the time.  

The tools available in today's world are almost endless.  Certainly, you will find a cool tool to do just about anything you can think of.  My favorite tool at the moment is a simple needle minder.  They are magnetic, so all you have to do is attach it to your project and set your needle on it.  Sometimes I attach it like a brooch.  No more poking it into a pincushion or putting an unnecessary hole in my project to hold the needle while I take a coffee break.  I also just installed a high density felted tile design wall.  It is proving to be invaluable.  

Along with these challenges, I love to take on quilt challenges from places like the Virginia Quilt Museum, who announce a theme every year.  The size requirement is always 15" square, so it's enough and not too daunting.  To submit the challenge, you pay $10 and send it to them to display in their museum.   They give you the choice to donate it to them to sell which helps fund their museum or have it sent back to you. Check out their events, shop, and display dates here 

The theme for this year's mini quilt challenge for the Virginia Quilt Museum is "BLUE".  How would you represent the color blue in a mini quilt?  There are unlimited possibilities to design, so I may go in the Improv direction.  My ice dyed fabric bin is full of blues so this would be a good time to use some.  It is due in July, so there's plenty of time to get started on it.  

The Cherrywood challenges for art quilters are a popular choice.  Cherrywood fabrics can be found online and at some quilt shows.  They will be choosing a new theme on June 10th.  The challenge just completed was Storytime theme.  

"Sarah's Garbage" 
This is my interpretation of Shel Silverstein's poem Sarah Cynthia Sylvia Stout would not take the garbage out!  My son read this on an audio recording when he was 9 years old and sped it up to sound goofy.  I kept it all these years, 31 to be exact.  He took the audio recording and had AI make a storyboard video to go with it.  Well, it was amazing, so I just had to use this as my challenge topic. 

Yesterday I found out that my quilt is one of many many finalists.  It will be on display in the coming months at various shows across the nation in the Cherrywood booth.  The web site lists the shows they will have a booth in and which challenge themes will be on display.  Son's rendition of the story is on this link.   If you participate in this one, you use their fabric selection for the chosen theme and create a quilt that measures 20" square.  If you want to enter it into competition, it's submitted on their web site along with a $30 entry fee with 3 detailed digital images.  It's certainly a rewarding experience just to enter.  
Last year the Cherrywood challenge theme was the Abyss.  I did not qualify to enter due to my embellishments were too jagged and the size was not spot on.  It now hangs in my bathroom.  But, here is a picture of it.  


"Leviathan V"
Both these challenges were fun in every aspect.  I loved adding things to them, building the design and asking myself "what else can I add to it"?   
This year the challenge theme is Jane Goodall.  I don't think I will make one on that theme.  It's too narrow minded for me.  I was hoping it would be Steampunk or maybe an era like Art Deco or Art Nouveau.  Maybe I could create my own challenge theme?   

Wednesday, April 16, 2025

Cake for Coffee Lovers

Right now, I am craving a little comfort food...cake to be exact.  

There's nothing more comforting than a piece of really good cake.  This cake takes the prize for me. While living in England, I had many versions of this cake as it's a popular teatime cake in many cafes across the country.
If you love coffee, you'll love this cake.  It doesn't have a strong overpowering coffee flavor and the walnuts give the cake great flavor and a little crunch to the texture.  

Coffee Walnut Cake


For the cake:
225g (2 sticks) unsalted butter, room temperature
225g (1 cup) sugar
4 eggs, room temperature
30ml (2 TBSP) strong espresso coffee, cooled
1/2 tsp espresso powder
225g (2 cups) self-rising flour
50g (1/3 cup) finely chopped walnuts

For the buttercream:
145g (1 1/4 sticks) unsalted butter, room temperature
pinch of salt
500g (4 1/2 cups) confectioner's sugar
75ml (4 TBSP) strong espresso coffee, cooled

To decorate:
12 walnut halves for the top arranged in a neat circle

Prepare 2 8" cake pans by greasing and flouring, set aside.
Preheat oven to 180°C (350°F)
Using a stand mixer, cream the butter and sugar until fluffy.  Add an egg and blend.  Add about a 1/4 of the flour and mix.  Repeat with remaining eggs and flour until all are in and blended.
Add the walnuts.  Stir the espresso powder into the liquid espresso and add to the batter.  Blend well.
Divide batter between the two cake pans.  Bake for 28-30 minutes or until cake tester is clean.  Allow cakes to cool for 10 minutes before turning out of the pans.  Cool completely on a rack.

Make the buttercream by blending all the ingredients as stated above until creamy and smooth.
Decorate the cake by piping rosettes of buttercream in a circle and placing a walnut in the center of the rosettes.  Chill before serving to make slicing easier.  Store completely covered.  
Enjoy with a cup of tea or coffee!  

Quilts for April

 Easter is on its way! I can't believe it.  It seems like we just put all the Christmas decorations away.  Are the holidays coming faster than they used to?  The stores are sure quick to put out the next holiday merchandise in the line-up.  I'm already seeing Memorial Day flags and July 4th items.  Really?  I am actually thinking backwards....or way way in the future, as I would like to make some St. Patrick's day placemats.  Also on my list of things I want to make, is a fall theme wool stitched table mat.  About 15 years ago I saw a pattern for it in a magazine and kept it along with some wool I've picked up.  


  But, on the top of my to do list is finishing my Art Deco quilt.  This quilt, for some reason, has been more than I can handle.  It measures 90"X90" and quilting it on my Bernina B740 has been difficult due to all the geometric lines and shapes as turning the quilt while sewing is a challenge.  It is now in the binding stage, so I'll be happy when it's finished completely.  I think this will be the last large quilt I do in my lifetime.  They are just too taxing and I will never purchase a longarm and frame to do them.  

Thursday, March 20, 2025

NQM-BOM all rounds

 So, if you've been following me or have read some of my past posts, you know I've been doing the National Quilt Museum's Block of the Month facebook rounds since it started in 2018.  The first couple I made verbatum.  Didn't change up a thing.  But, I get bored.  I use a variety of fabric colors and textures, sure, but I get bored.  So, by round #3 I started choosing a theme to coincide with the BOM.  Changing just minor things to their monthly sample blocks.  Sometimes not changing the block at all.  It gave me joy to create a block inside my theme but fit their criteria/style/technique.  


NQM-BOM Round #1


NQM-BOM Round #2


NQM-BOM Round #3 -  Theme Japan


NQM-BOM Round #4 - Theme Tesla & Nature's Elements


NQM-BOM Round #5 - Theme Video Games


NQM-BOM Round #6 - Theme Art Deco

If you've never seen the instructions for this Block of the Month project, then let me tell you the instructions are brief.  You are left to make your own choices as to fabrics, placements, borders, etc... You read each instruction from the designer of the block and make it, plain and simple.  

 For round #6, I really felt that it wasn't "finished" with the 8th block, which was meant to be the final one.  I made an extra block as I wanted the 3X3 (9) setting.  These blocks are 14" square.  That's pretty big and I felt it needed some substantial borders to bring it all together.  So, that's how this one grew into a Queen size bed quilt.  Yes, it measures 89"X89" square.   The search for what to do next was easy for me.  Keeping in theme, I knew I wanted some sort of fan shape and a take on 3D so it was just a matter of drawing and sizing the border sections to create two border patterns.  This quilt is my favorite of all the rounds I've done and I can't imagine topping it, so this may be a good place to stop and call it quits on the BOM's.   It's currently in the process of quilting on my B740 Bernina, so it's slow going.  If it gets finished by the time our local quilt show is on, I may enter it.   

It's got to be called a series, in my opinion.  An accomplishment.  Each one different, but also the same.  Looking back, I am glad I started this journey.  I've learned quite a bit from each of the different designers for all these blocks.  Thanks to the National Quilt Museum for offering this free to facebook users BOM group.  Join, learn and create.  Go Here


Wednesday, March 19, 2025

Retrospective for my 2024 year

 The phrase, "It's a wrap" has become a cliche.  As well as, "It's in the books".  Why do we repeat phrases over and over until they really have no significance or meaning anymore.  How about this one from a few years back, "it is what it is"....what does that really mean?  I would say in contrast, "it isn't what it isn't".  Please stop, take a little extra time to explain whatever you mean.  Afterall, it is true, we've lost the art of conversation.  Literature, poetry, ordinary conversation used to be one of  the arts of romanticism.  In todays times, people are inserting emojis, icons, abreviations, and frankly have lost patience for long winded paragraphs explaining absolutely everything.  

Thankfully, there is still a growing number of people creating and learning the art of stitching whether it's embroidery, tailoring, knitting and crocheting, crafting, or piecing and quilting.  It takes time, you don't want to rush through something just to be done.  Enjoy the process, examine and work through each step.  Technology has made learning anything you can dream of accessible and easy to obtain.   

Do people take time to make New Year's resolution lists?  I admit that I don't anymore.  Every year there are carryover projects or ideas that I never had time for or I get a mental block and want to let it sit in the corner longer.  

Looking back on the year, I am happy with the amount of work I have accommplished.  In retrospect, these projects were...

Mini challenge (Flower Power) for the Virginia Quilt Museum exhibit, was donated to raise funds for the museum.  I titled this one, "Nocturnal Garden Gate".


I taught a class on collage for my guild.  These are small mug mats, so it was a small project they could finish in one day.  


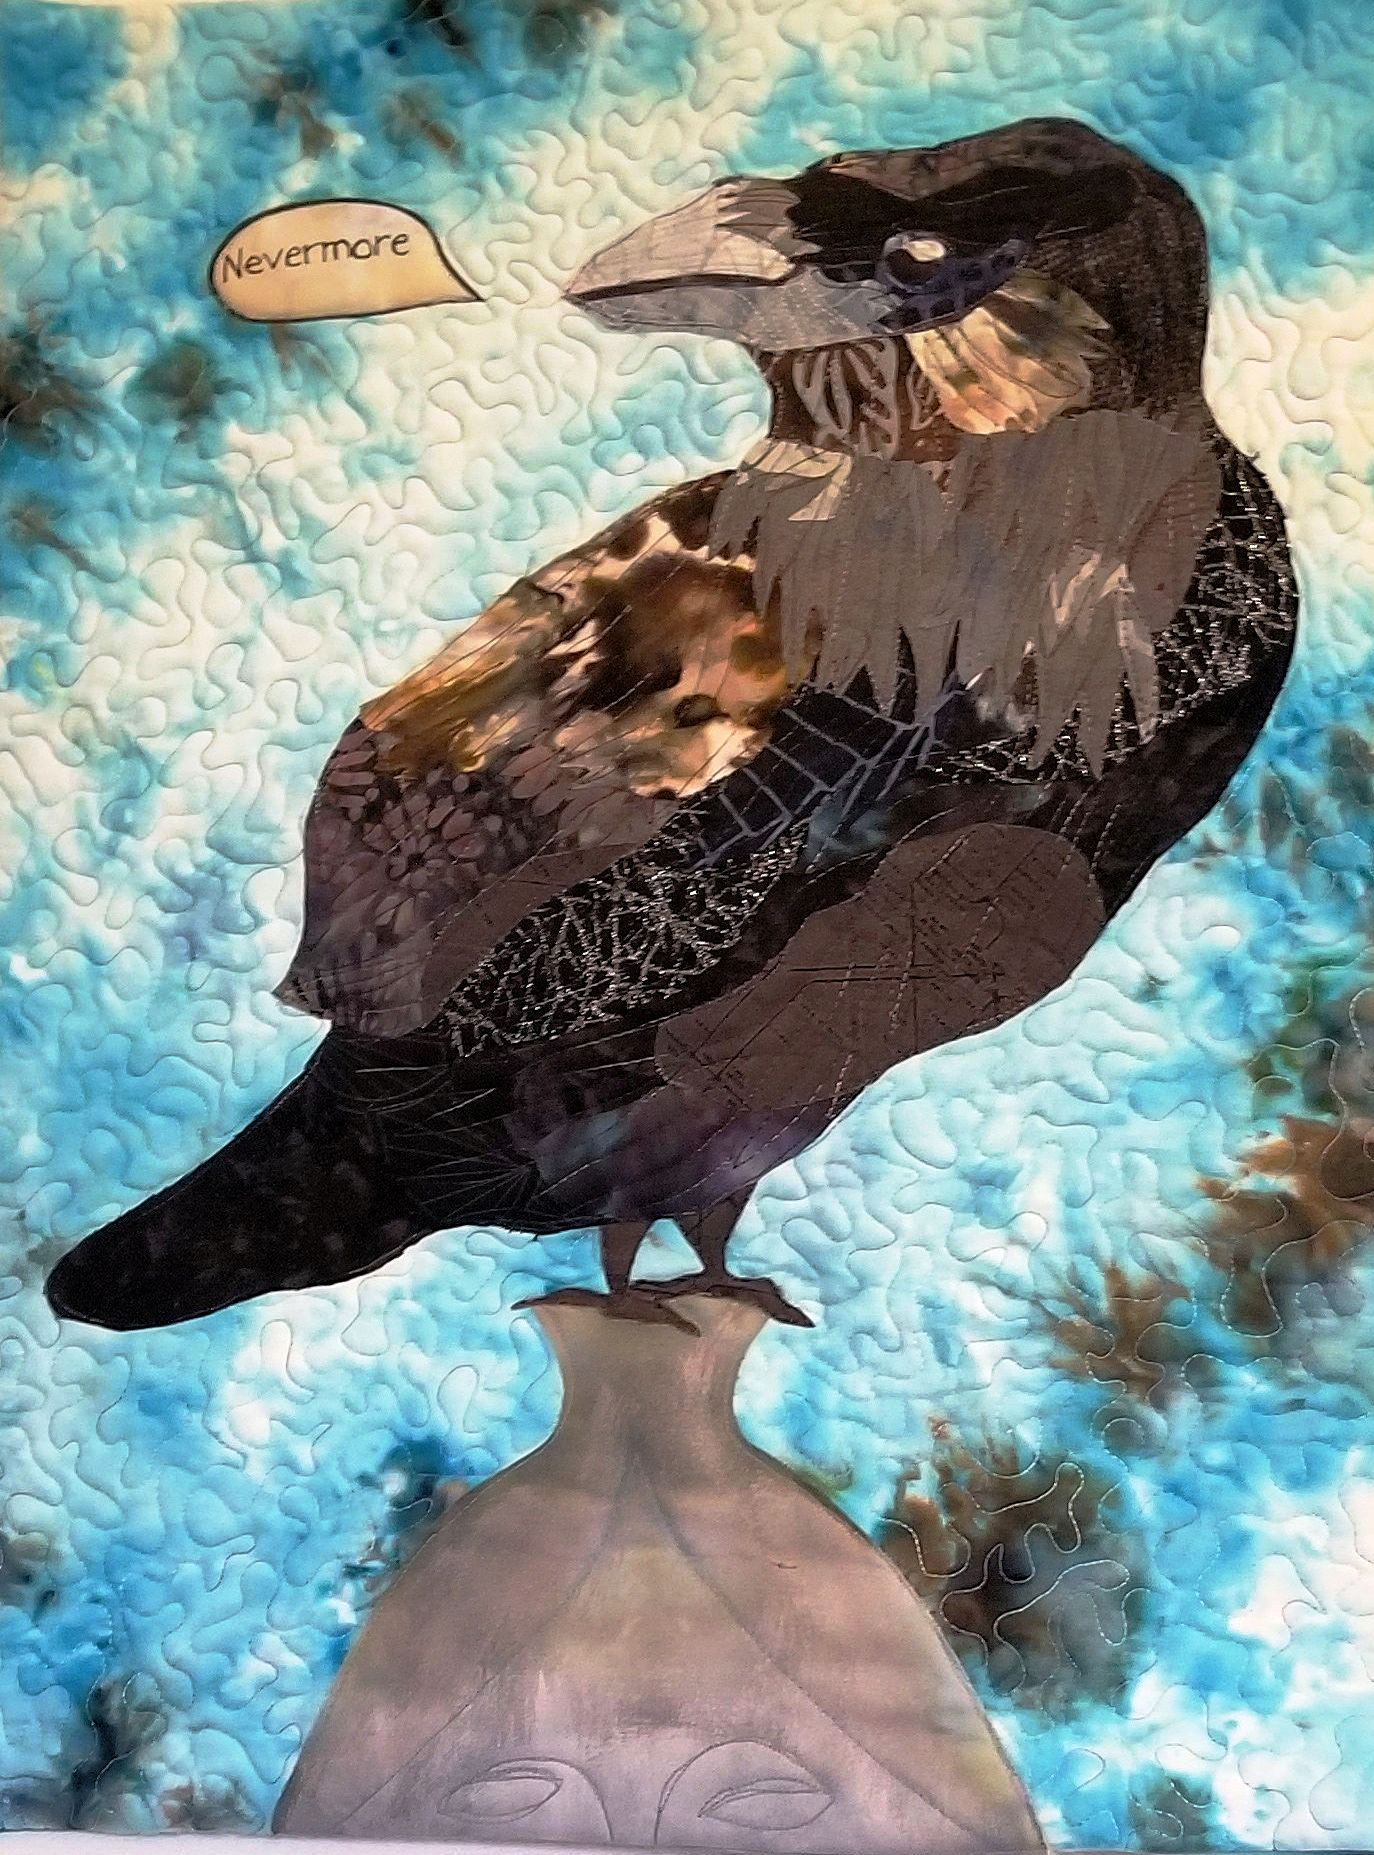
I made 2 Raven mini quilts.  One went to charity and the other went to my DS.  He loves Edgar Allen Poe.  

This is a quilt I call Alice's Fantastical Garden.  It's collaged using Emily Taylor's technique and most patterns from her book.  I added so many butterfly fussy cuts that every time I count them, I come up with a different number.  They're hidden in a lot of places.  

Still a work in progress, 89"X89".  This is the finished top completed by the end of December 2024, but it's been challenging quilting it on my Bernina 740 domestic machine.  The National Quilt Museum facebook group round 6 for 2024 and will probably the last one I take part in.  I've done every year since they began, so I'm pretty tired of making the sampler type quilts.  However, it's been a wonderful journey to be part of this group.  

There are more quilts I haven't mentioned, but these were the important ones that...dare I say....I am proud of.  Acknowleging God's gift and fulfilling my artistic need to create them.  So it continues...

Cookbooks and recipes

 I love books.  The artwork of bookcovers amazes me along with the artwork throughout the book's pages.  I just love to thumb through books of all kinds.  Cookbooks are my choice at the moment.  I have 5 shelves full of cookbooks that I have accumulated over the years.  Sometimes I ask Alexa for a recipe, but it's not the same as finding it in a cookbook stained from previous times where I've splashed vanilla or unknown ingredients on the pages.  Some cookbooks will never be reprinted.  Some are just old enough where people have forgotten either the author, restaurant, or other reason why the cookbook was published.  

My Neiman Marcus cookbook is a treasure.  It contains so much history of the why that came about for this fashion company to persue culinary excellence in their flagship stores.  Once a very long time ago, I was fortunate enough to have experience a meal at the Mariposa restaurant.  Of course I had to try the Chicken salad sandwich.  It is their signature lunch sandwich and it's been a menu favorite for over 50 years.  This recipe is in the cookbook along with the coveted Chocolate Chip Cookie recipe of urban myth.  The myth being that someone had requested the recipe from a NM cafe and was charged $250.  This is false, they never charged any amount for their recipes...ever.  Whether it was a gimick marketing ploy by NM or just an out of hand rumor, it didn't matter.  Neiman Marcus stayed popular and didn't fall from grace by the public.  

With that, I want to share recipes from the cookbook.

Chocolate Chip Cookies

1/2 cup (1 stick) butter, softened

1 cup light brown sugar

3 TBSP granulated sugar, or white sugar

1 large egg

2 tsp. vanilla extract

1 3/4 cups all-purpose flour

1/2 tsp. baking powder

1/2 tsp. baking soda

1/2 tsp. salt

1 1/2 cups semi-sweet chocolate chips

1 1/2 tsp. instant espresso coffee powder

Yield= 2 dozen cookies

Preheat oven to 350F. Place the butter, and sugars in a mixing bowl, beat on medium speed for about 30 seconds. Beat in the egg and vanilla until well combined.  In a separate bowl, sift together the dry ingredients except chips and coffee powder.  Add slowly to the mixer, beating on slow speed.  Beat for 15 seconds.  Fold in the chips and coffee powder.  

Prepare a cookie sheet using a scoop or 2 TBSP measure, drip cookie dough onto the sheet leaving 3" apart.  Gently press with the back of a spoon.  Bake for 14-18 minutes or until browned around the edges.  Remove to a cooling rack and store in airtight containers.  Or freeze cookies in an airtight container.  

Chicken Salad Sandwich

2 3/4 cup diced chicken breast, poached

1 TBSP cider vinegar

1/2 cup minced celery

3/4 cup mayonnaise

3 TBSP heavy cream

1 1/2 tsp salt

1/8 tsp ground white pepper

8 slices of whole wheat bread

4 large green leaf lettuce leaves

1 large tomato, cut into 8 thin slices

In a bowl, mix the chicken with the vinegar.  Add the celery, mayo, cream and seasonings. Fold the ingredients to gently combine.  Cover and chill in the refrigerator for about an hour.

Place 4 slices bread on a clean surface.  Top each with 1/4 chicken salad and top with lettuce leaf and 2 slices of tomato, top with a slice of bread.  

Optional:  Try adding crispy bacon.  Use whatever bread you like including croissants, cheese buns or cheddar biscuits.  

This recipe is creamy which is part of the secret to its success in the NM cafe's.  

Hopefully, recipes like these and tens of thousands more will never die off and I think as long as we cherish a written recipe or keep our cookbooks from accumulating too much dust from lack of use, maybe next generations will also appreciate their culinary/historical importance.  I've rambled on about these recipes, now it's time to make something great in the kitchen.  

Saturday, December 28, 2024

Grandmother's Quilt


Unboxed and spread out on the floor.  It was basted to all the layers and didn't lay flat.  The backing extended 6-8 inches all around.

A friend of mine of nearly 30 years asked me to help her with a quilt her Grandmother started. Of course I accepted even though we are a couple thousand miles apart.  When it arrived, it was basted to the batting and backing and had a wide solid red border all around the edges.  She had someone baste the top to the batting and backing which was clumped, gathered and bubbly in places.  That was the first thing I took apart and asked her if it was OK to remove all the basting and layers so I could lay it flat and see what was going on with the top.  She assured me that it was OK and anything I did would be acceptable as she trusts me to do what is right for it.  The top had strips and squares haphazardly spread around with many different fabric weights and compositions.  There were old sheets cut into strips and squares, home dec fabric that were possibly drapes, some polyester squares that could have been trousers, polyester knit backed pieces that may have been clothing or a blanket.  It was a collage of so many pieces of her family history.  Over time, the pieces wore holes through in places even though it was only a top and not a finished quilt.  My friend cleverly patched these areas with applique's.  A group of birds here and some leaves there.  One large applique was the Hello Kitty face, so cute and recognizable.  It was an ecclectic mix of texture and color with deep meaning for her.  I asked her questions like, "are there any sacred pieces that I should not alter?"  She only mentioned one specific piece that contained barnyard chickens, so I took note of that and made sure I didn't alter that square.  The top was a massive 120"X120+".  "Will it go on a king size bed?", I asked.  She responded, "I think it's too big, so cut it to fit a queen size".  I cut off the red borders except the wonkiest edge to tackle that later.  One step at a time was how I worked on it.  Section by section.  In the places with excess bubbles that didn't lay flat, I made small pleats near the seams to be less conspicious.  I hand sewed the pleats down. 

 When the entire top laid flat with minimal bubbles, I had to consider the different weights of the pieces and decided to reinforce the reverse side of the lightweight sheeting with fusible interfacing.  All the outer edges needed the interfacing. But, this gave a lot of body to the edges which will help extend the life of the quilt and make the quilt stitches stand out.  The block with the applique bunny was a thick polyester woven blanket fabric, so I also fused interfacing to the reverse side of that block.  


Next, it was time to consider the edges.  One edge was particularly wonky.  Knowing that a straight edge wasn't going to look good, I had to think what would make it look less obvious.  

In the next communication with her, I asked if she was opposed to a scalloped edge to try and hide some troubled areas.  She thought that was a stellar idea.  Making a paper template, I cut the edges into a wave instead of a scallop.  Matching the top and bottom waves.  Then, matching the left and right side waves together.  It wasn't square, so I wanted it to appear even all the way around. 


When it came time to do the quilting stitches, I suggested an all over pattern.  So, I did a large free motion meander stitch pattern from edge to edge.  It was amazing that there were only 2 places where a fold could not avoided.  I know where those area are, but it's completely inconspicious. 

With the red border gone, the quilt had a more grown-up vibe, so I didn't reuse the red for the binding.  Instead, I suggested a pretty blue solid.  She approved of that, so I cut bias strips and finished the edges off with binding.  It was so satisfying to see this quilt now finished after being put aside for so long.  


Quilting stitches done, added the wavy edge binding and finished the binding by hand to the reverse side.  So large it doesn't fit on my domestic machine sewing table so I crumpled it for the photo to show binding edge. 
Finished quilt on Queen size blow up bed.  Finished size is roughly 100"X95"

I carefully folded and placed it in her garment bag and boxed it up to be sent overseas.  It was a long couple weeks in transit, worrying about it all the while.  When she received it, I got a message from her with complete joy over the work I did.  She expressed how she will cherish it now as a colaborative quilt made by her Grandmother, herself, and her friend (me).  I'm so thrilled that she loves it and trusted me to carefully finish the quilt it was meant to be.   Later she asked how to care for it.  I expressed to her that minimal cleaning is best and not to wash it in a washer or drying it in a dryer.  Dry cleaning would be the best way to freshen and spot clean it.  I've had success using Woolite home dry cleaning products in a very low heat dryer.  Sometimes just airing out a quilt to freshen it is enough.  A couple hours in the sunshine is OK.  

Monday, August 19, 2024

Labeling Quilts


It's sometimes an afterthought to add the label after completing the quilt.  Most times, sadly, it's never added and the information about the quilt's maker is lost.  Like my last blog post about quilts telling stories, does every quilt need a label?   Afterall, I make quilts to satisfy me need to create and I assume when I leave my earthly home, they will go to my DS to do whatever he wants with them.  I am OK with that.  They served their purpose by my creating them and I don't expect anyone else to like them or use them.  So, do these have to be labelled?  My time is precious and short, so do I need to spend an extra few hours creating the label?   My short answer to this long question is....YES!

What's the point of labeling?  The information added to the quilt is vital to future generations to know about the maker, who the maker is/was, where the maker is/was from, why it was made, when is was made or finished.  It's not a guarantee that the quilts will survive you.  That will depend on the quality of materials, construction, environment conditions, etc...but most likely, the quilts will last for many generations to come if taken care of.   It could be sold or given to someone who never knew you or your family.  I've seen plenty of quilts in garage sales, antique shops, thrift stores, auctions, and sadly, some are thrown away or retired to a dog pen. 

When I add labels, I make it relevant to the quilt.  It's not just a scrap off the floor and stuck in the bottom back corner of the quilt.  Making it relate to the quilt makes a statement that the information is important, attaching it in a prominent area on the backside of the quilt and stitching through the label as a permanent patch.  

There are hi-tech options to add like tagging.  If you submit the quilt to national shows and it's out of your hands and control for periods of time, I could see this expense as a kind of insurance.  Speaking of insurance, this is a good idea when you enter shows.  I've heard so many horror stories of loss and damage to quilts.   

Documenting quilts can go further than just placing a label on the backside at completion.  Maintaining a spreadsheet or journaling all your quilts with information like who it was gifted or sold to can help relatives know where all your quilts went and who may own them, what year they were made, why it was made, if the quilt is no longer/cut up for other things, etc...and all that can be documented in a spreadsheet or word file which makes updating easy.   Keep these important details with all your other important documents so that your survivors will be able to locate it.   Make notations of where you want your quilts to go if you haven't gifted them to who they are intended for already.  You may have an antique quilt in your collection that a local quilt museum would like to have if it's not intended for anyone else in the family.  Sometimes professional quilters have passed away leaving quilts to family, but they don't want them, or they have simply kept their favorite works you've made and cannot keep them all.  Spelling out details in a will might be what you need to do.  

When I see a quilt with a label, the information contained is appreciated and important.  It could also add to the value and importance of the quilt.  A quilt made by a nationally known artist will be more desirable and worth more.  Like all forms of art, an accomplished artists' work carries a price relevant to their expertise.  It's also important to state whether the quilter's maker is a professional, has a quilt business, website, etc...as that will tell about them which reflects their style, history, experience, and ability.

I've heard the saying, " it's not a quilt until it's quilted".   To me, "a quilt's not completed until the label is attached".   


Journal mini quilts

                                                                         "Beach Glass mini" Journal quilts are those works of art ...