Friday, October 25, 2019

Thoughts on Improv


It's always exciting to start a new piece of improv work.  I love not knowing where the journey will take me, but setting limits keeps the work in check.  I make decisions along the way and ask myself questions like what should go next.  Do I want a curve?  Does this side need a different color?  I spend only seconds to a couple minutes on the decision making and move on.  One of my problems in the past with template or reproduced patterned quilts is that I get bored with the process after deciding on which fabrics to use. Rotary cutting hundreds of triangles or strips is just tedious for me.
I find it liberating and relaxing to use a pair of scissors to cut and use chalk to mark a curve.


I use a design wall to place the first few pieces and work out from there.  It's very different than a traditional quilt pattern.  The only thing I have to keep in mind is what my limits are that were set in the beginning of the work.  In this case, I wanted to use a rectangle shape and frame it to look like windows.  The next step may be to add squares between them or strips?  I will audition them and see what my answer will be, letting my brain decide at that time.  For this piece, my limits are size, keeping it less than 36" on any side; fiber content, these fabrics are all decorator weight, denim, wool, canvas, etc...; color range. 

  One thing I don't do, is think ahead and plan or have a predetermined idea of what it "should" look like.  I also don't want it to look exactly like anything as that would be art quilting. If I wanted to represent a tall skyscraper, it would be drawn out on paper to use as a pattern and pieces would be cut from the pattern.  I call it quilt by number, like paint by number.  Improv can look like something, but it's unintentional and individual as the brain is trying to interpret it into something known. 


This one started as strip sets pulled from my scrap bag, sewn into 4 sheets in differing widths.  Then, I added an element by cutting the sheets into curved seed shapes.  I added bias strips to the edges of the seed shapes and put them on my design board.  I needed to add a background, but didn't want a solid piece of fabric, I had some large triangular shaped solids in my scrap bag and placed them behind my seed shapes. 


At the time I didn't like the bright blue or the orange, but I loved the lime green. I also turned the shapes and added some cut pieces  to each edge to add some interest. It's not perfect, not measured, but the eye and the brain thinks it's close enough and becomes pleasing.  These are the answers you want to be left with.  Here is the finished quilt. 


When you make a mistake on a quilt made from a pattern, it is painfully obvious.  If you make a mistake on an improv or art quilt, its interpreted as intentional.  Most times only you will know of a mistake.  The question then becomes, can I live with it?  My one second answer is YES.  Have a  sew-full day! 

Wednesday, September 11, 2019

Fall Inspiration

The fall season is definitely my favorite season.  The fresh fall air is delightful to breathe in and a full spectrum of color sparks inspiration. 


The color isn't the only wonderful quality fall carries.  Softer lighting creates beautiful textures in nature.  The fall season doesn't last long enough.  It's the best gift saved for last before the harsh reality of winter sets in.  I enjoy this season the most when a bountiful harvest is reaped.  All my senses are satisfied.  Yes, this is my season.  

Thursday, August 29, 2019

Improvisation

I've just finished another improv pieced wall hanging.  The strip sets were sewn together in no particular order.  My limits were to use scrap, limited colors and 3 solid fabrics.  There had to be at least one curve incorporated in the design.  I had to ban the use of rulers, but I did use a rotary cutter and scissors. 

Once I started cutting and sewing, it all just flowed and my decisions were quick, I didn't dwell on a selection long. 

My DH made me a design wall many years ago from a piece of 1" thick foam core board and I covered it with batting.  It is an essential tool and I don't know how I lived without it before.  The wall helped with Improv as I pinned up my pieces and would step back to see it from a distance adding or taking away before cutting and sewing.  Moving pieces to see how it changed the look.

The far right section in the picture above was moved to the left in the next picture, which is what I went with, sewing it in place and moving on to another section. 

This is the final quilt.  I used a teal blue quilting thread and machine quilted free motion curved lines.  To me, the best quality of Improv piecing is that it's NOT a pattern to be repeated.  It's NOT meant to BE something, or a representation of something.
 It's truly ART up for personal interpretation.
Ask yourself, what am I seeing?  How does it make me feel?


Thursday, August 22, 2019

Morsbags


For several years, I have been active with the Morsbag.com global project to make and donate handmade textile bags and bring awareness of the damaging use of plastic bags to our environment.  Usually there is a handout day that's planned ahead of time that takes place in well populated areas.  I've given away bags at event entry doors.  They are never to be sold for profit.  The textiles you use to create them are items that are worn out or destined to be thrown away, or could be newer fabrics.  There are so many good places to hunt for textiles like resale stores, yard sales, even fabric stores that are selling cheap lines or have to give away bolts.  Some beautiful bags have been made from curtains, old quilts, clothing, worn jeans, wool, etc... Please go here to read more about this project and join/create your own pod or get the bag pattern.  These bags will be given away at this event in November while my supply lasts. 


Just my opinion on this topic...Here we are, almost done with August.  It's been one heck of a hot summer but thankful there are minimal storms where I live...so far.  Energy Star recently made a suggestion on the internet for recommended home temperature settings.  Go here to see the ABC news article.   There was a lot of angry discussion over this topic.  Quite frankly, I agree with Energy Star, but there are other factors to consider.  Our home is not energy efficient to start with.  We had to beef up our insulation, get new windows and install an insulated garage door so the heat wouldn't just seep through the house.  Something else to consider is solar panels.  This is costly up front, but in the long run, it will end up paying for itself.  Going green should be something everyone considers, as one person will not make much of an impact on the environment, but as a community, we could make a start. 

Tuesday, August 20, 2019

NQM - BOM blocks 9-12

Though I finished the quilt back in April, I didn't follow up on posting it.  So, today I am catching up.  The designers that National Quilt Museum has chosen to do the BOM has been amazing.  The last 3 blocks are no exception.  Block #9 was a Japanese design by Robin Gausebeck.  This is my finished block.
Adding the sashiko stitching really brought this block to life.  I used a chalk pencil to draw the flowers and the cube shapes, then stitched with Japanese cotton by hand.  Three of the colored squares are hand ice dyed fabrics that I did earlier. 
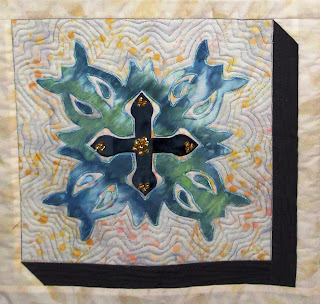
Block #10 is Hawaiian applique.  The designer chosen was Nancy Ann Sobel.  Her sample was a dogwood, but I wanted to put in the turtle as a reminder of the turtles we had seen while there some years ago.  The turtle fabric is also ice dyed.
Block #11 is the pinecone inspired by Betty Ford-Smith.  This one was very challenging as all the folded triangles are layered making it very heavy and bulky.  Not my favorite block, but it was fun to learn about it.
Block #12 was the Courthouse steps pattern inspired by Kim Niedzwiecki or Go Go Kim.  I enjoyed this paper pieced design.  Each of the logs are super narrow. 
The dark gray shadow really shows off each block giving them a lot of contrast.  
I added a gray outer border and quilted each block with a different design.  The gray outer border is quilted with a feather design.  I finished it by the deadline and received the special label.  

Monday, August 19, 2019

Selvage Edge Piecing - Make a mug mat

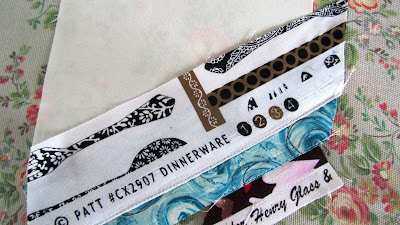
Selvage edges can be used in piecing for interesting design and effect in a block or project.  After purchasing your yardage, check out the selvages to see if you want to save them from the bin.  Rotary cut at least 1" into the print so you will have enough to sew onto and leave for interest. 

There are a few books and articles written on this technique.  I have purchased the book by Riel Nason entitled, " Modern Selvage Quilting" published in 2016.  This book explains her method of piecing and 15 projects to make.
About 3 years ago, I made these mug rugs and blogged about them, however since then the post is lost into the ether.  So, if you're interested, I will try to explain the method of creating them.  You will want a wide variety of selvage strips to choose from in varying widths.  There are lots of choices to consider like adding just color bubbles, text, or blanks.  For the size of your foundation square, requisition your strips and set them in the order you want to sew them.  Decide if you want the orientation to be straight across or at a diagonal. 
Cut your foundation fabric from muslin.  These are 5 inches square.  Cut a backing fabric from a contrasting print. 
Lay your first piece in one corner.  Sew a straight stitch from edge to edge following the line between the printed edge and the text edge.  Lay your second strip over the top edge of the first by at least 1/4" for the seam allowance.
Sew down the second strip close to the edge.
Be sure to leave at least 1/4" seam allowance underneath.


Sew down the third strip close to the edge leaving as much print as you desire from strip 2.
Flip down and trim away the excess leaving the seam allowance for strip 2.
Continue adding strips until your foundation square is completely covered.  
Now you will trim away the strips hanging off the edges of the foundation square.
Stack the batting, backing and your pieced square together and sew around leaving an opening to turn.  Press and close the open edge.  Quilt as desired.  
I usually edge stitch very close and then follow the diagonal edges to finish. 
Here is the reverse side of the 4 mug mats.
They would make a nice house warming gift or hostess gift.  
 This is my next selvage edge project.  I used mostly modern fabrics and limited color choices.
Happy sewing and enjoy!  :o) 

Wednesday, May 22, 2019

Original S&Q Expo weekend


This beautiful butterfly wall was in the lobby of my hotel near Atlanta.  It shimmered and shined in the sun drenched entry as they are all made from metallic paper and pinned to the wall.
It was just breathtaking.  The hotel associate just smiled as I apologized for taking pictures and she remarked that a lot of people do it and are equally amazed.
Anyway, why was I staying in a hotel?  I went to Atlanta for the Original Sewing & Quilt Expo.  There were a lot of classes I was interested in taking, but ended up with 3 good choices.  My favorite was the Shibori dyeing class taught by Cindy Lohbeck.  https://www.handsonhanddyes.com/about-us.htm  There was a supply fee which ended up being a full kit minus the dyes, but at the end of the class, she let us take some mixed dye home to experiment with along with more fabric pieces.
These two photos show my work.  I am so happy with the outcome.  She was a good teacher and explained the technique quite well.  

The second best class I attended was a paint stick class taught by Laura Murray.  
The paint sticks are oil paints in stick form and you do rubbings over the surface of a textured plate and create all kinds of design possibilities.  You can also use the sticks with stencils.  


If you're interested in attending an Original Sewing & Quilt Expo go to https://www.sewingexpo.com
There were classes over 3 of the days, fashion shows, displays, vendors and lectures as well as daily giveaways and a grand prize giveaway.  It was a fun few days away and now I'm filled with inspiration.

Catherine's Wheel

 I posted December 17, 2020 about making an ornament which is called prairie wheel (USA) or Catherine's Wheel (UK).  The latter being of...