Tuesday, November 20, 2018

Quilted Ornament Place Mats

For this year's Christmas project, I've made 6 place mats in this ornament shape.  I didn't purchase a commercial pattern, I drew out the circle on paper and used a box shape for the cap on the top.  Searching for my compass was a disaster, and using a pin and string is too involved, so I took the largest plate/platter from my cupboard and drew around it.  I believe it measures 14" in circumference.  The box for the cap is actually an empty straight pin box.
I fused the 3 pieces of the ornament onto thermaweb batting, then sewed on the rick-rack.  I quilted each section with angled lines on the bottoms and meander stitching on the tops. The backs are cut from the pattern shape and using the pillowcase technique, I stitched around leaving an opening for turning.  I pressed the mats, stitched the opening closed and top stitched around the mat.  They will be perfect for our table throughout the season.    


Monday, November 5, 2018

NQM - Blocks 5-8

In an earlier post, I mentioned that I have joined the challenge of the National Quilt Museum of Paducah Kentucky's, Block of the Month program.   Click on this link to join or see the published block projects.  We are to learn techniques each month by making a selected artist's 10.5" block using our own choices and stash of fabrics.

For block #5 (August) they chose the artist, Stephanie Soebbing and the Van Gogh Cherrywood Challenge display at the museum.  She took the play on words, "Up Close with the Stars" display and created a close section of the Starry Night painting.   I created two blocks and chose to go with the one on the right and then added more to it.
I used embroidery stitches to create more movement and look similar to brush strokes.
I also used Inktense sticks to bring out more orange in a few of the stars.   When I quilt this block, I may make more swirls in the darker blue sky areas.  
The next block, #6 for September, was inspired by the youth education program at the Museum. Becky Glasby, the director of education at NQM, chose the Glider block using machine paper piecing technique.  
This is my block.  Please ignore the grey strip on the right for the moment.  


At this point, I had 6 blocks already done and half way through the challenge.  I couldn't stop thinking about how these were going to go together.  Traditional sashing strips and corner stones didn't appeal to me.  I liked a modern look and the 3D effect of some tops I had seen before.  So, I got to work auditioning fabrics for the outer borders and the 3D shadow pieces and came up with this.


So, at this point the first 6 are together.
Block #7 for October was inspired by the exhibit "Color Outside the Lines" at the museum.  The designer, Justin Stafford, chose the watercolor technique for the block design.  I again, made 2 blocks and had to make a decision.

The top one was done using the exact technique as stated.  I didn't like it at all. Using the fusible pellon grid interfacing made it difficult to sew perfectly and it didn't lay flat. It was bulky and didn't measure 10.5" square.  I did the second one using a strip piecing technique and it ironed flat and measured a perfect 10.5" square.  Not to mention the colors used are more pleasing.  The picture shows the sashing added to the square, which I will do from now on so I can get it done faster in the end.  Keeping notes on each block will help me in case there are any questions about what I did in creating each one.  

The Block for November turned out to be another traditional block called "Dutchman's puzzle".  It is inspired by the display of Kansas City Star quilts currently in the museum.  At this point I am hoping the next couple blocks will be contemporary so they will balance together better.  Faith Jones of FreshLemonQuilts.com was the chosen artist for this month. 
These are the colors I chose to go with.
So far I've completed the 8 blocks and have the first 6 together.  


Monday, October 29, 2018

UFO - Improv seeds

First off I have to thank my DH for purchasing this lovely Ottlite for my sewing room.  It's great to be able to have a bright light to see my work.

I started this improv about 2 years ago and it's been sitting in my UFO pile waiting to be machine quilted.  Today, I decided to get it out of the pile and finish it.  Since I don't really care too much how it is quilted, I just started with vertical lines and added a few spaces with swirls and pearls to practice. This is strictly a scrap quilt, as you can see, I wouldn't normally  choose these colors to go together.  I just pulled these randomly from my scrap bag, chopped them up and went to work sewing them together.  What I really like about this quilt is the scale of the "seeds".

 When I attended City and Guilds quilting course in the 1990's, my favorite artist at the time was Georgia O'Keefe and her enlarged flowers and landscapes.  I'm happy I have a finished UFO, but now I would like to explore more on the enlarged scale and see where that will take me.  I certainly have enough scraps to experiment with.


Wednesday, October 24, 2018

Petal Tiles - Part 3

Here they are, all 16 of them ready to be trimmed and sewn together.  But, wait, I don't want to just sew them together with the white edges touching each other.  This seems boring to me, so I go to work figuring out what is best.  I love the Kaffe Fassett fabrics and have a lot of them in the full range of colors which were used in all of these blocks along with other designers that worked well.

After throwing them on the floor and arranging a few fabrics between blocks, I decided I didn't like using just one fabric for all the sashing strips, however I did use the same corner stone fabric for each intersection, but a different color of KF's paperweight design for each sashing strip.

Blue is my absolute favorite color, so I went with the blue snail KF fabric in the final outer border.  I fussy cut the cabbage rose fabric for each outer corner square.  So, this is the top ready to be sandwiched.


Now, I've got it all sandwiched and pin basted ready to quilt on my machine.  A simple design like around each petal in the white grout  and echoing to the sashing strips is what I have in mind.  All done in free motion quilting as I am not patient enough to draw out any lines or designs.

The border may have a feather design for each side of the quilt, think that will go well with the swirly shapes of the petals.  Even that won't be drawn, I will just sew a curvy center line from one corner to the other all around the border, then start free hand sewing the feather shapes.

I estimated almost 200 different fabrics went into this quilt, so it would be a great scrap buster design.
Not finished yet, but I wanted to see how it looked on my bed.  Have a great sewing day.  :o)

Thursday, July 19, 2018

Fusibles - Tile Petal blocks


I'm in the middle of making the tile blocks and want to share my experience with you.  I've used fusible for many years and several different brands.  Years ago, it was a concern with longevity and quality of the fusible.  Will it yellow with age?  Will it some how react with the fabrics it's fused to?  What temperature is optimal for fusing?  Each product is different and will fuse at a different temperature.  I would suggest testing the fusible on scrap fabric to see what your result will be before using on your entire project.  When I was a student in C&G, I did this test.   But, that was many years ago and products have improved.  So, if you're concerned about the outcome, I would do a test first.

These blocks measure 17" and will be trimmed down before they get sewn together.  I'm using fusible web for the pieces appliqued to the background squares.  Following the manufacturers directions for each of the fusible products I am mentioning here with mixed results.  As you can imagine, this uses a lot of product.  I've already used up all my Steam A Seam 2 adhesive, which I said before was a nightmare to work with.  The only advantage is that it's tacky and can be repositioned if you need to move a piece around before fusing.  This product leaves a sticky gummy mess not only on your needle when stitching down, but also behind the applique.  What will this do to the fabric in the long run?  Or, maybe it will wash away....eventually.

In the picture shown above, I have removed the background behind the piece so that there is no show through on the front and as you can see, there is a lot of residue.

After running out of the Steam A Seam 2, I searched my drawers and found some Heat N Bond Lite.  This product is a better choice as it is not as sticky and gummy and pieces can be removed by making a slight scoring on the reverse side of the layers and place a bone tool between to gently un-stick the piece.  Stitching down is also easier but your needle will gum up a bit.  I always keep cotton pads and rubbing alcohol near by to clean off my needle when necessary.


The large circle was showing through the small circle, so I cut away the background and larger circle so that there is only 1 layer of applique in the center instead of 3 and no more show through.


The interfacing product I am using is a fusible interfacing called Totally Stable which is cut the size of the block and ironed on the reverse of the block to prevent any tunneling while blanket stitching the edges of applique.  This is easily torn away after all stitching is complete, but can leave some tiny bits behind.     You can choose to remove all the tiny bits with tweezers, which to me is very tedious and boring or just leave them.  They'll be buried between batting and stitched with quilting on top, so they don't have anywhere to go.   And they are tiny.   My choice is to leave them.
           
It's slow going, but I only have 5 more blocks to make until I can trim them all up and start the next phase which is sewing them together.   Have a great sewing day.  :o)

Sunday, July 15, 2018

Summer Strawberries

This picture has nothing to do with what I am posting about, I just like this one my son took of an outdoor sculpture of a "jack" at our local library.  A few years ago, I would take a lot of pictures of food I would make, but I've gotten away from doing that.

I look forward to every summer season and all it brings, especially when strawberries ripen and I can go to a pick-your-own farm to get them fresh.  Usually I make jam, strawberry shortcakes, strawberry ice cream, or just eat them plain or with cereal.  They're even better dipped in chocolate for a simple dessert or chopping them up and adding them to oatmeal or on top of waffles.  Recently, I've discovered a new recipe.  It's light and refreshing "strawberry soup" served very cold in a bowl at breakfast as a fruit course.  Similar to a smoothie, but different and should be served in a chilled bowl with a spoon.

Strawberry Soup

1 pint strawberries, cleaned and hulled
1/4 cup sugar
2 Tbsp. fresh lemon juice or orange juice

In a saucepan combine the above ingredients and heat over medium heat, stirring occasionally until sugar is dissolved.  With a stick blender, whiz until smooth, let cool completely and then continue with the rest of the ingredients.

4 oz. plain or strawberry yogurt
1/2 cup half and half, or 2% milk, or if you like, cream
 Whipped cream for garnish (optional)

Add the next two ingredients, mixing in well and chill until very cold, at least 4 hours.  When ready to serve, ladle about 1/2 cup into chilled bowls or parfait dishes and top with a dollop of whipped cream.

I hope you will try this recipe and will like it.  If you don't like milk or yogurt or have an allergy, you could try a substitute.  I have not done that, so I don't know what the outcome would be.  If you do substitute, I would be interested to know if it worked so please leave me a comment.   Have a berry great summer!

Monday, July 9, 2018

Petal Tile Blocks

I am still working on my Petal Tile quilt blocks.  This block was taken from the book, "Tile Quilt Revival" by Carol Gilham Jones & Bobbi Finley.   The instruction in the book had templates for a 10" version and you are suppose to increase the size by 150% on a photo copier.  Well, I didn't have the time or patience to run up to my local copy store, so I just took some paper, taped it together to measure 17" square and started drawing out the shape.  It's not perfect, and that's what I like.
You applique each petal working from the center out by either needle turn applique or fusible applique technique.  As I stated above, I have little patience and time, so I am using fusible.  My machine is set on blanket stitch and I am using "Totally Stable" on the under side of my background to prevent tunneling.  I mentioned before that "Steam-a-Seam 2" is the product I used on the first 5 blocks, but it is gumming up my needle so bad that I am switching to "Heat-n-Bond Lite" along with the stabilizer.  After deciding which technique to use, place the template upside down in a window or on a light box and draw out your pieces onto the fusible paper side if using.  

 If you're using the needle turn method, use freezer paper to draw out each piece and when you cut them, be sure to add about an 1/8" seam allowance to each petal.  This will give you the "grout" between each piece.  Number each petal so you know where they will be placed on the block.  


Making the blocks in stages keeps me from getting too bored with one process at a time.  The top set of 5 are completely finished except for the trimming.  The second set of 5 are ready to blanket stitch.  The third set will have 6 blocks, then I will trim them to 15.5" when all are completed.  I haven't decided about adding a border yet, but I know I will not be set with sashing strips.  I want the quilt to measure 80"X80" when finished.  

All the fabrics I'm using are from my stash and I place each color family in their own pile and whatever looks good to me is what goes into each block.  Some of the fabrics and color families will have to be repeated.  After seeing most of them done, I am getting excited to carry it through to completion.  After these blocks are put together, I think my machine will need a well deserved "vacation" at the local Bernina store to get cleaned and serviced, it has been a while.  


Thursday, July 5, 2018

NQM - BOM the first 4 blocks

The National Quilt Museum in Paducah Kentucky put out a call to quilters to join their Block of the Month challenge to start with the April 2018 block.  It is a free challenge which will teach quilters a new technique every month for a year.  By April 2019, the final block will be revealed and quilters will finish their quilts to see if they qualify for the first 1,000 finished to receive a special label to place on their quilt.

I am trying for this accomplishment and following the instructions as closely as I can.

For the April block, Mr. Domestic, aka Mathew Boudreaux, gave us directions for "Bow Ties" using either English Paper Piecing technique or an easy Machine technique.  I chose to do EPP by hand.
I love the way this block turned out, it looks like bathroom tile to me.  The center squares on point are hand dyed fabric and the others are commercially dyed batiks.  

For the May block, Regina V. Benson, was the chosen artist to make a block using hand dyed fabrics we created.  The block should contain an organic element like earth, fire, sound, or water motifs using abstract composition, curved shapes, and asymmetrical layering in improvised piecing.  Her work is astounding and can be found here.  
I chose to ice dye my fabrics and scissor cut them into strips and chunks sewing them together to look like water and reeds.  

In June, the block to create was inspired by the Japanese Quilt Artists exhibit at the Museum.  We were to create a block from a sample block they provided including a pieced background, an applique Mt. Fuji and some embroidery embellishments.  I loved this block's elements.

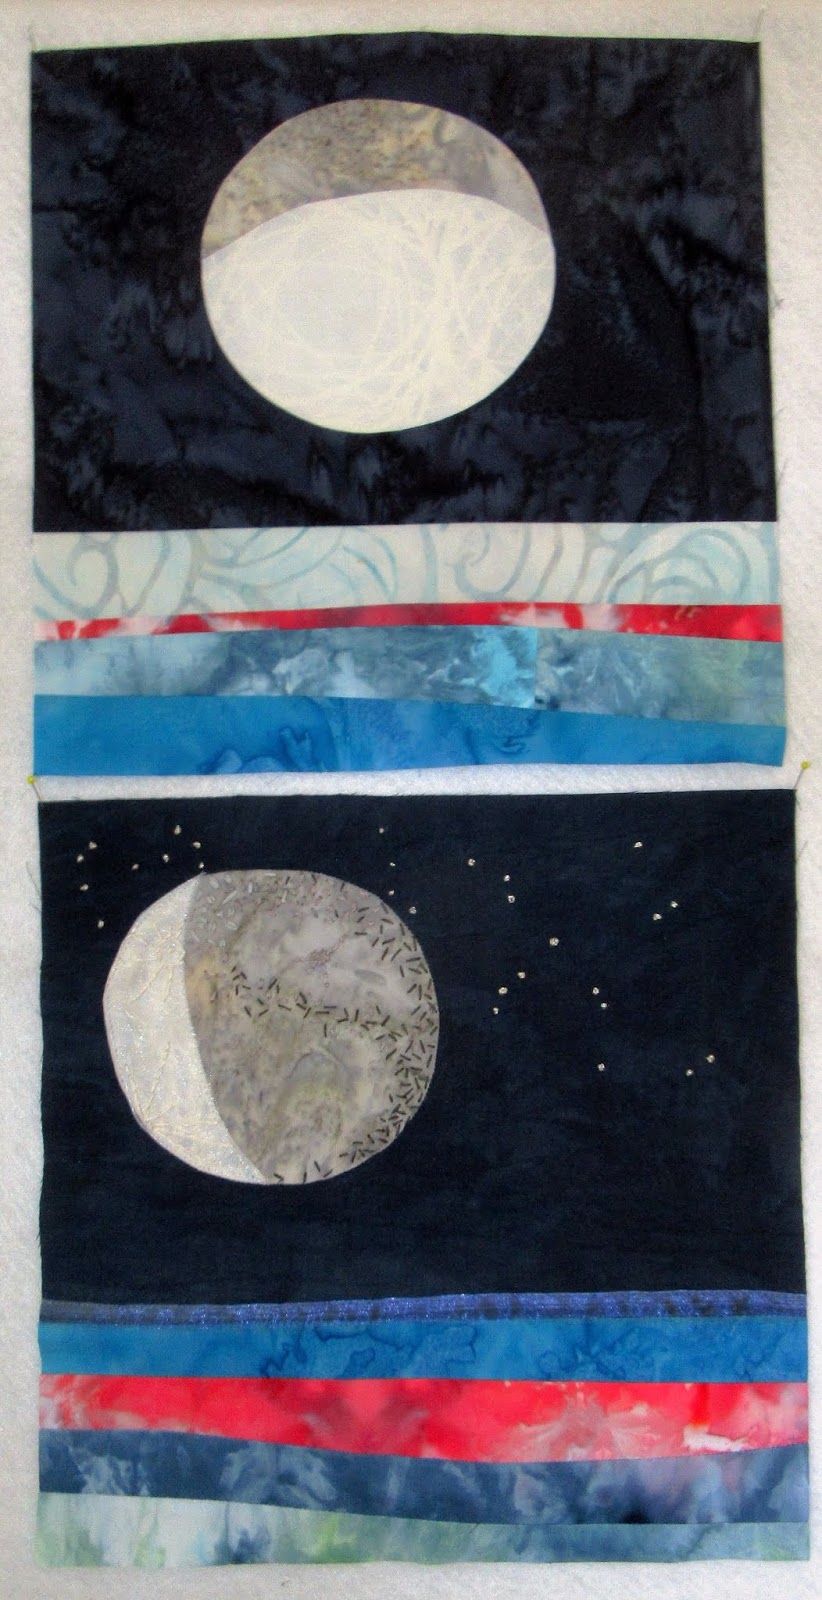
For the July block, the exhibit "Fly Me To the Moon" is on display, so we were to create a block from the sample block provided with a moon motif that is pieced by machine using Annabel Wrigley's technique.  Adding a 3.5" atmosphere motif that is ruler-free rotary cut into strips and sewn into a stripe set at the bottom.
All the blocks are trimmed to 10.5".  You can find out more about the BOM club challenge here.

So far I am enjoying this challenge.  But,when I finished the moon block, I was not completely happy with it.  The moon was a little wonky and the stripes were not quite like I wanted them to look, so I created a second attempt.
I like the stripe set better on this second one, but the moon is the wrong size, so I cannot use it.  In my attempt to make a perfect circle, I didn't measure my circle right at the onset.  UGH.  I may chop off the bottom atmosphere and replace it with the first moon block's atmosphere set.

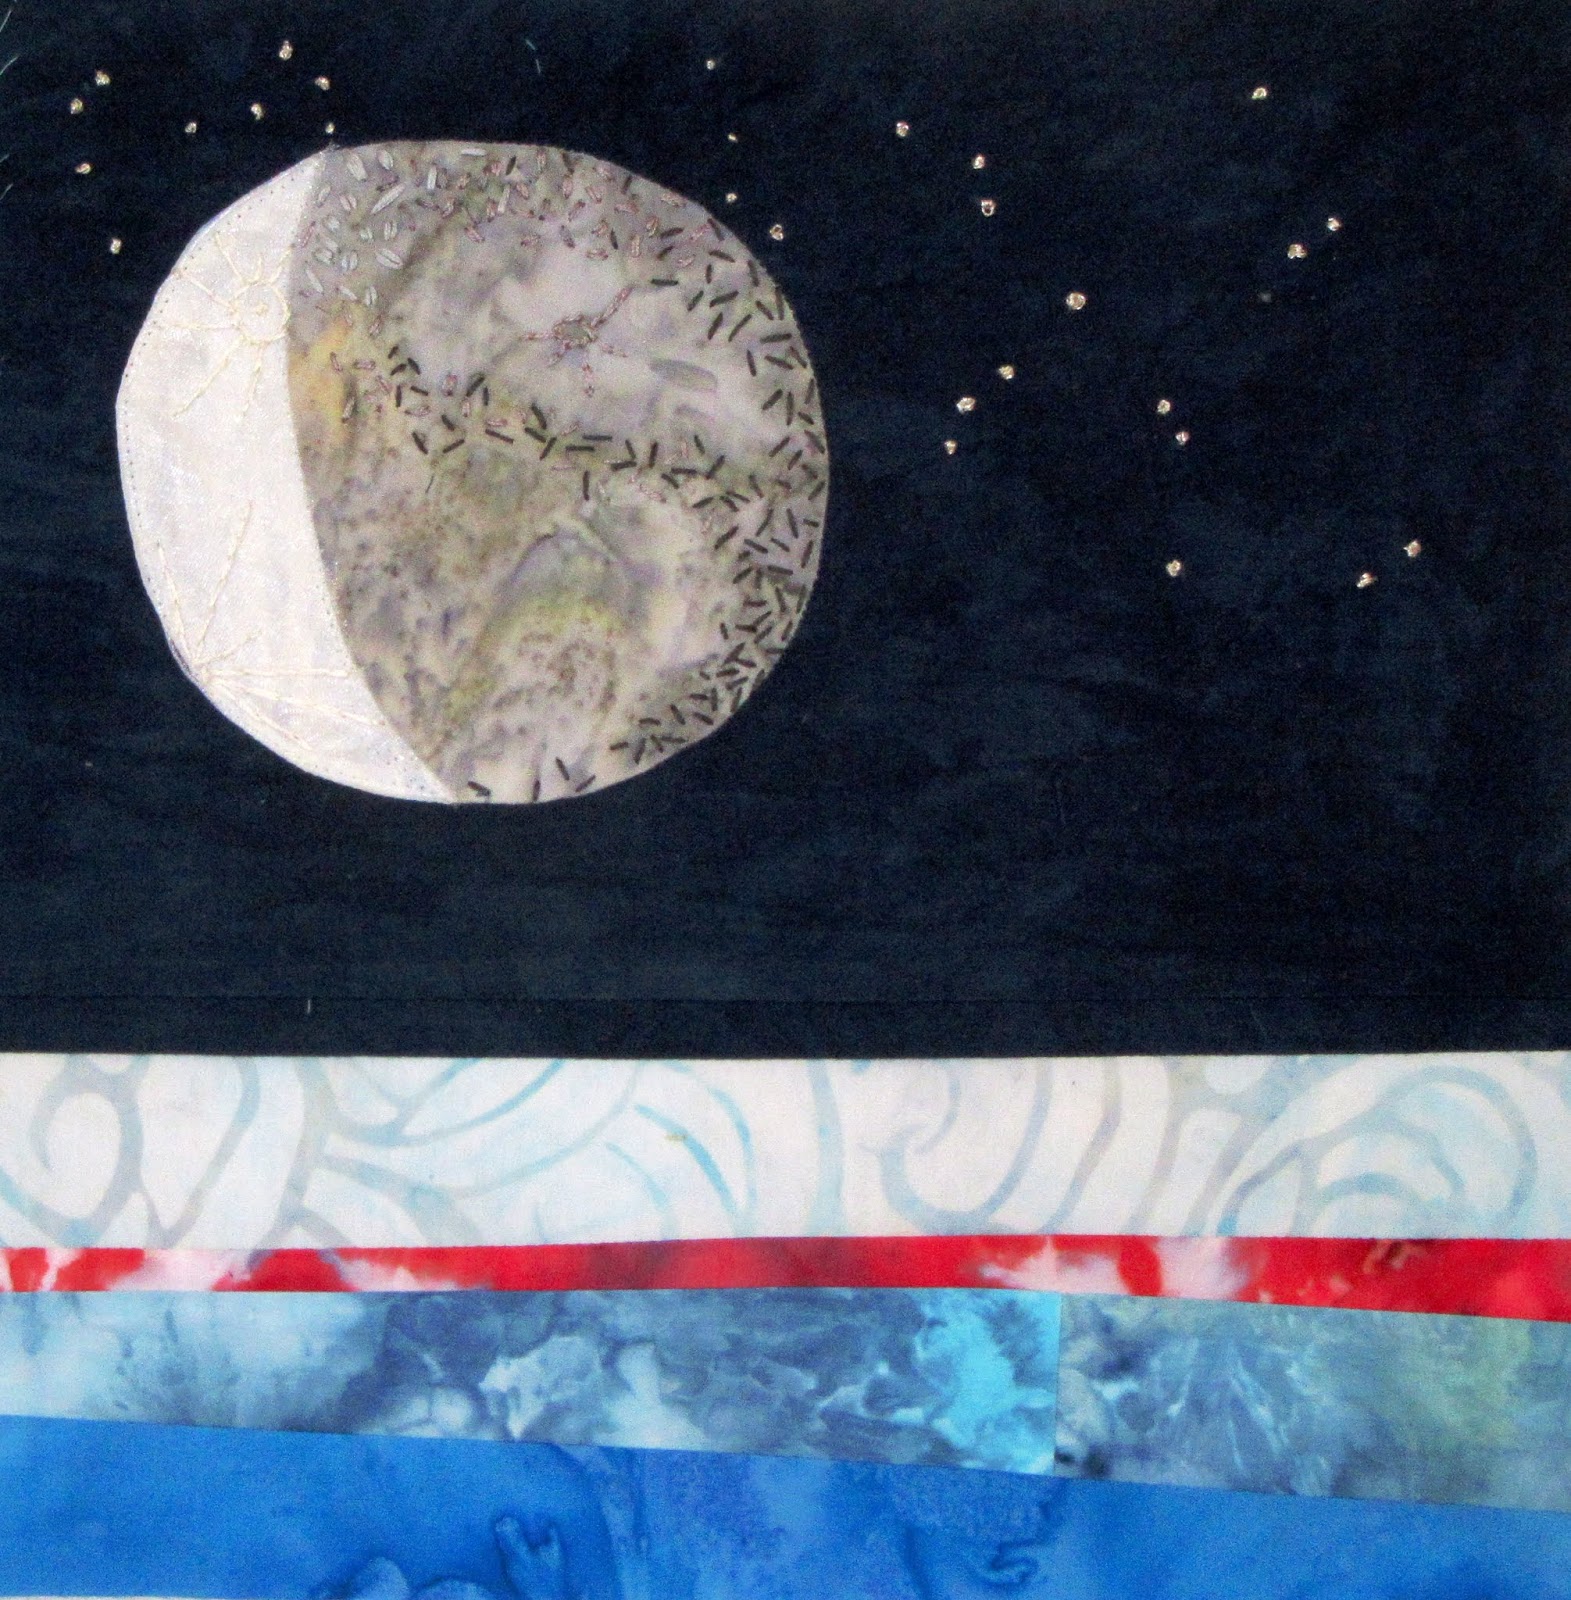
After writing this, I went to work chopping off both strip sets and switched them.  I am happy with the results and will go with the embroidered moon block even if it is a little wonky.  The second block will go in my orphan block bin.

Here it is and  now, I'm happy with it.  I'm anticipating the next month's challenge and hope it will be just as interesting as these first 4.


Saturday, June 30, 2018

The Color of Laundry?

What does laundry have to do with choosing color palates?  Well, pictures speak louder than words.

Wash day today.  This is not my laundry.  I like this grouping of blues and grays.

This is my laundry.  Bright and colorful.   If I were to choose one of these groupings for a quilt, it would have to be this bright picture.  But what if one of these bright colors ended up in the first photo, would it be a bad thing?  It would certainly stand out, however it would add a lot of interest and unexpected pop to the grays and blues.

 I have picked up a book in my library entitled, "Color Play second edition" by Joen Wolfrom.   In my opinion, she is a master teacher of color in textile media.
I attended one of her classes almost 20 years ago and it helped me make choices in grouping colors together to make interesting quilts.

Currently, I am working on tile quilt blocks.  The blocks are 15" and appliqued with petal shapes.
The blocks will be random in their color ranges, so even though they may have other colors included in the cut petal shape, they will read as the overall color of each block. 
So far, I have 5 made with 11 to go.  I am using the fusible adhesive product, Steam-a-Seam 2, for the applique shapes.  On the reverse of my back ground, I am using Totally Stable stabilizer which is also fusible, but more of a temporary hold.  Sewing through all these adhesives gums up the needle quite a bit and I'm finding it frustrating.   


I will have to double up on the color blocks to make the 16 blocks.  This will work out to 4 block by 4 blocks square and measure 80"X80" when finished.  
Working on this quilt will keep me busy and out of the extreme heat of the summer months.  


Monday, April 23, 2018

Blue Sapphire quilt in retrospect

I finished this quilt about a year ago and realized I didn't mention it in this blog.  So sorry if you were anticipating the outcome.   My son loves it and has it hung in his office.  When I finished the quilting I took a step back and decided it really didn't need anything else added to the design and to be honest, I was ready to move on to other projects.

This is the back.  You can see every "flaw" like merging over the echo lines, but it's free hand, free motion and certainly free drawing so in a sense it's like handwriting.  It's an individual style and I don't apologize for it.  If I used tracings, stencils or even rulers to quilt by machine I think I would be bored to tears and it wouldn't look like my own work.


 "Colorado Improv" was also finished about a year ago and was a fun little quilt.  This technique is a great way to use up scraps and just play with shapes without using precise cuts and measurements.  I want to explore more with Improv techniques using what I have in my scrap bag.

I've started on this little project, reminding myself to keep it small, as this one is made from non-traditional fibers like linen, polyester, rayon, wool, upholstery fabrics and denim (yikes) what will the end result be?  All I know is that it will not be utilitarian or large.  It would be too heavy and not hold up to everyday use.


Exploring the unknown is what keeps me interested in the art of quilting.  

Friday, April 20, 2018

Beyond Frugal

Warning, this post will be mostly ranting.  I just feel that I have to get my thoughts out there today. 


Ok, call it what you will.  Thrifty, frugal, tight, or the real hurt...cheap.  I am!  And I will sometimes add that term to my full name inserting the appropriate term into my middle name.  But, I look at it as being resourceful.  When staying in a hotel, I always choose one that offers free continental breakfast in the price of my room.  I eat until I'm full and carry a few bits back to my room for later.  Give me a break, who doesn't do this?  I'm not talking about plates full of food.  One sachet of peanut butter and jam and one apple is lunch to me.  And if saving over $15 a day just for lunch is what I need to do these days, then that's the way it has to be.  

Let's share a cup and ponder on this.

When I buy fabric, or threads, I always buy what's on sale.  I've never gone into a brick and mortar shop to choose designer themes and patterns and tools.   Oh the tools!  Tools for every little thing. This has turned into a multi-mibillion $$$$ industry!  Patterns for absolutely everything and then some.  Patterns that have been rewritten for rotary cutting or paper piecing.  The pattern library is enormous and you could spend a fortune on just a few patterns or books with patterns.

Threads are NOT something I cheap out on, however I buy the best when it's on sale.  I currently have 4 full drawers of threads.  I can safely say that I will never have to buy another spool of thread as long as I live, just hope everyone loves purple.  After all they were on sale or the "try me" price which was about 40% cheaper than a regular spool, you just couldn't always choose your own color.

 I got these free about a year ago and still haven't tried them out.  A good choice for my scraps.

Speaking of fabric.  Do you discard pieces smaller than say 2"?  My scrap bag is huge right now even though I sifted through it a few months back and donated some.  My pieces range in size and all jumbled up in one huge tote bag.  Not ideal, I know.  If I spent time sorting by size or color or both, I would never get anything done.  That would consume my life, no doubt.  The only type of sorting I've done is cutting off 1"-2" selvage strips and put them in a container.  

These are just selvage strips.  The top picture are mug mats I've made from strips like these.  

Back to patterns.  Remember having to draw out our patterns on graph paper, then draw that onto template plastic (or recycled card, the frugal choice), cut it out and draw it again onto your fabric and don't forget to add that 1/4" to your drawn pattern piece!  I still have my "1/4" seamer ".  Yes, and how many of those tools you had to buy for one class or one pattern are now unused and pushed to the back end of the drawer?   It doesn't matter if you bought the pattern from the teacher or a shop or downloaded it online and had to print it yourself, they cost a small fortune since you may only use it once.   The frugal choice.......wait for it..................buy used from sales, or google free patterns online (my favorite right now).  Social media like Pinterest can be a great source for inspiration.   Another great choice is the local library.  I love the library, and yep, free!  And, the library will let you photocopy up to 10 pages, at least ours will, yay!  Their quilt book selection is huge as well as their knitting and crocheting selection and instructional DVD selection.  Their web catalog lists other county libraries and will get you a title if it's available out of my area.  Did I mention that I love the library?

Ok, there it is.  I feel better and after reflection, will strive to not buy anything on a whim even if it's on sale and possibly explore my "hobby" in a tighter sphere honing one aspect instead of thinking that I need to try it all.  At one time, I wanted to create a technique book as I did in C&G years ago, but really, who am I kidding?

Catherine's Wheel

 I posted December 17, 2020 about making an ornament which is called prairie wheel (USA) or Catherine's Wheel (UK).  The latter being of...