Friday, May 21, 2021

Quilts blocks in May

May is here and the flowers are blooming!  After working in the yard, getting it ready for the growing season ahead, I got to thinking about making some flower blocks.  I joined in on one of Amy Friend's swaps from her Petal+Stem book using FPP.   She's into round 3 of the swaps, but I didn't sign up to swap anymore.  Instead, I will make some from my fabric stash of ice dyes produced over the last year.


Here are 4 blocks I've completed.  The flower pot block is an ice dye that gives rusty look.  The butterfly on the bottom right used 2 hand ice dyed fabrics and the leaf block is also my ice dyed green fabric.  

At the start of the year I signed up to do 2 BOM's, 2 mystery quilts, a challenge mini quilt, UFO challenge and this FPP swap.  It's become too much for me so I dropped the mini challenge and one of the mystery quilts.  This has helped me stay on schedule and focused, however I wasn't able to complete a UFO last month and I may not be able to complete one for this month.  At the end of the year I will just have to carry some over and that's OK.  It's satisfying to complete a project off the UFO list.  American Patchwork & Quilting UFO group does this challenge each year.  Go HERE to find out more.

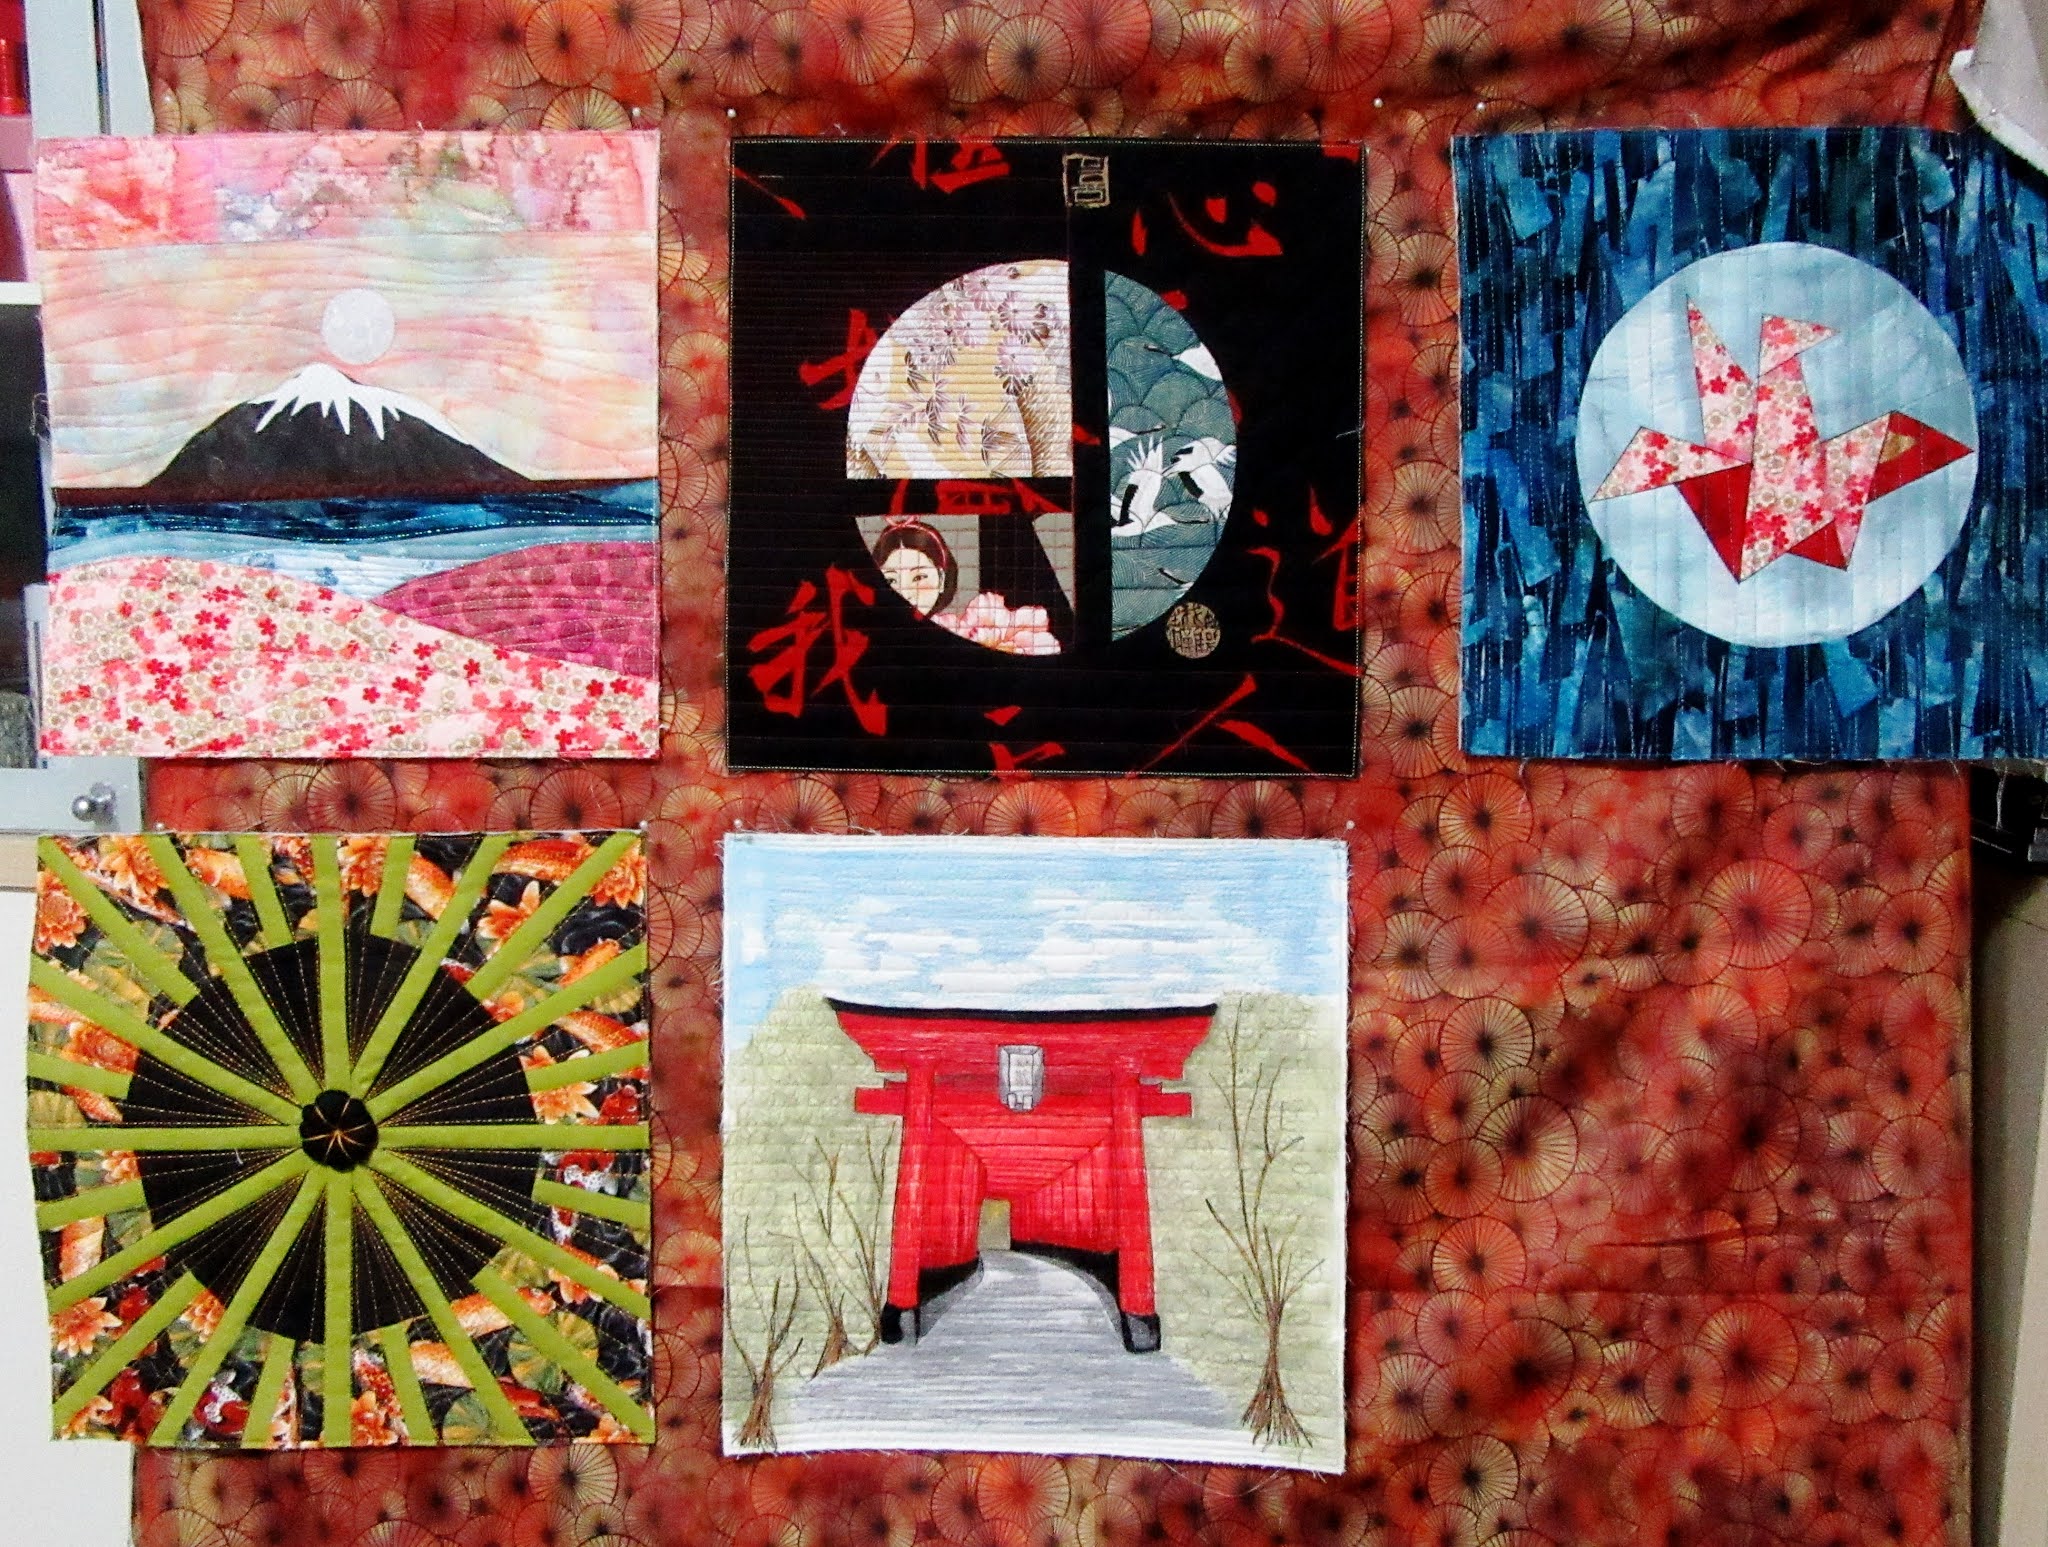
The National Quilt Museum BOM- Round 3 - So far, I've kept my blocks to the theme I chose.  Each month has challenged me to a degree.  One of the challenges for me has been applying the Quilt-as-you-go method (QAYG).  Here are my blocks so far.

                                               January, February and March 2021 blocks.  

January's block included machine piecing and inserting a circle onto the background fabric.

February's block included techniques of machine piecing wavy lines, appliqueing a circle and other elements into the block.

March's block used FPP (foundation paper-piecing).  

                                                                         April block

April's block uses FPP sewn inside a circle and inset onto the background fabric.

                                                                         May block

May's block was created using paint sticks and thread painted on a white background fabric.  This month's sample called for whole cloth quilting.  This is primarily why I chose to paint and thread paint, then quilt it. 


My May block was created in stages over days and days of work.  Starting with my drawing and a white square of fabric that measured 15" square, I traced with a light box with pencil onto my square.  I outline stitched the pencil with black thread.  Using Caran D'Ache NeocolorII paint sticks and Permanent Tulip Fabric Markers (in the end), I painted each area letting the sections dry before moving to another section.  I heat set the entire square and fused my stabilizer to the back.  I inserted it in my hoop and started thread painting each section.  I wanted my paint and thread to show rather than filling in completely with thread, so I only loosely painted with thread and left some of the details out like detailing leaves because the Shinto is to be the main focus.   After all the thread painting was completed, the block was sandwiched between the backing and batting.  Basting spray was applied to hold the layers together while I quilted the horizontal lines which are evenly spaced.  Lastly, I trimmed the block to 12.5" square and basted close to the edge all around to hold the quilting stitches in place and keep the edges clean.  


Each block is quilted and trimmed to 12.5" square and at the end of 12 months the 12 blocks are sewn together with sashing strips on the front and back with a strip of batting between (if needed).  My sashing strips will most likely be at least 3" wide, so I will need the batting strips.  

I'm looking forward to seeing next month's block and how I will fit into my theme.  Since June's block will be the half way point, I will start to think about what fabrics to join them together with and start doing just that.  I could wait to the very end and shuffle them around, but I don't think I will wait that long.  

Sunday, April 11, 2021

Snippets, Crumbs, and Confetti


When it comes to scraps to save, how small is too small?  Well, it would depend on what your intent is.  Do you like scrap quilts using crumbs?  These are pieces as small as about 1.5-2" finished.  Maybe you like snippets size?  These are fairly larger pieces up to around 4" finished.  Confetti scrap is a piece that ranges from .5" to around 1.5" finished.  Finished means you've measured the piece after sewing in the seam allowance.  For quilting, the seam allowance is always a scant .25".  So remember to figure in a half inch to allow for the seams.   

Another way to use even smaller pieces is to use fusible web on the wrong side of your piece and chop it up into snippets.  There is no seam allowance needed as you will fuse (glue) the pieces on and stitch over the top of them.  Layer the bits over your background (paper removed) and arrange to your design.  This is a lot like collage quilts, however the snippets/bits are tiny.   Use tweezers to place the pieces accurately.  Fuse in place when you've completed placing your design down.  Cover the top with organza, if using.  The netting or organza should be a neutral color and sheer enough to see through.  Now you're ready to FMQ or thread paint over the snippets.  This technique adds some texture and dimension, but is only good on Art quilts and would not hold up on utilitarian quilts. 


 The size of this art quilt is going to finish at 4" X 6".  


This is another piece done using this technique.  The black tree trunks are added after the organza/netting.  I started each of these with a drawing from my journal.  The background piece used is muslin, however the stiff pellon fusible product would work too and serve a dual purpose.  You will not need a background foundation piece or the fusible on each scrap.  


Monday, February 15, 2021

Sourdough Biscuits

 What can be more warm and satisfying on a cold winter wet day than a fresh batch of sourdough biscuits and a pot of tea?  I could have this all day everyday.    My sourdough discard is ready to use after 5 days of feeding.  I love its subtle tanginess.  Here's a recipe to try.  These biscuits are delicious with a little jam and clotted cream.  They were gone in minutes.  

Sourdough Biscuits

1 cup all-purpose flour

3 tsp. baking powder

1 tsp. salt

6 TBSP. unsalted cold butter

1 cup starter, unfed discard

1-2 TBSP. whole milk (if needed for dough to come together)

Preheat oven to 425°F.  Grease an 8-10" iron skillet and set aside.  In a mixing bowl, measure all the dry ingredients, stir.  Cube the cold butter into the flour and work in until pea size bits remain.  Make a well in the center of the bowl and add the starter.  Stir together until dough comes together.  Add milk a little at a time if needed.  Turn out onto a floured surface, pat down to about 1" thickness and cut into circles.  Place next to each other in the skillet.  Bake for 18-22 minutes.  Brush with melted butter and serve warm.  


My wrist has begun to feel better, so I am hoping to get back to sewing tomorrow.  Our guild has put out a challenge called "just initial it".  Using only 3 initials from your name, 2 for colors and 1 for the pattern, creating a quilt no larger than 160" total parameter measurement.   I chose "Shaded Trail" pattern and my colors are Purple and Linen.  The pattern is paper pieced and I've never had so much trouble with pp up until now.  I think it's because I cut my strips slightly too narrow.  I am using commercially dyed purple in dark and my hand dye light purple.  If I can get it right, I'll make a table runner.  


Friday, February 12, 2021

Valentine's - not just cards

Happy Valentine's Day!  Some may consider this holiday a "non-holiday".  Just a consumer based card holiday, that is, when people used to send cards.  Well, whether it is or isn't, to me it doesn't matter.  I love Valentine's Day.  I always have.  My parents married on 12 February and I always thought that was such a sweet time of year to get married.  I would spend my own money to buy them a box of Valentine chocolates every year through my teens and the first year or two I was married.  It never went over well in the end.  Hoping this gesture would bring some love and/or happiness to either or both of them.  It didn't.  But, that didn't break me from the hope Valentine's day brings.  To me, it's the opportunity to show the person you love that you care for them, admire them and appreciate them for who they are.  Where did I get these lofty ideals?  Especially coming from such a morose family dynamic. I digress.


When I made this quilt, I didn't know where it would take me.  I started out loving the idea of using "conversation hearts" like the candies.  Using sherbet like colors, not just a pink and white color palette. Each of the heart applique blocks have a conversation line, like "hug me", "be mine", " you're sweet", etc... I also wanted to add the words, "Be My Valentine" using a free piecing technique as described in Tonya Ricucci's book, "Word Play Quilts".   Fifteen years ago, there weren't a lot of options to add words to quilts using piecing or applique, but now there are several books and resources to do that.  I like the free pieced look.  It's not perfect, and that's what I like.  Non-pattern quilts are my favorite quilts as they tell a story of what the artist is saying, thinking, or feeling.  Start somewhere, add something or take away something.  See where your ideas will take you.  


My wonderful DH brings me roses every Valentine's day.  He would bring me roses everyday if he could.  He is a true sweetheart.  He knows how much this means to me.  It's not just a motion to take on Valentine's day, that that is the thing to do.  During our poor years, he would bring me a single rose because it was cheaper.  I would dry the rose and keep it in my journal or in a vase.  It would remind me how much he truly loves me... that he would take his last $3 to buy me a single rose.  Back in those days $3 was a lot of money, especially for us.  

Paper pieced hearts made into small mats/mug rugs

Applique block made for a donation quilt

Quilted needle case using some non-traditional colors.

"Blue Without You" postcard

"My Heart" postcard

"Love Letter" postcard

Multi-medium postcard

These are some of the quilted Valentine postcards I've made over the years.  It was so much fun using some non-traditional materials for these.  The "Blue Without You" postcard was a challenge submitted and pictured in a Fabrications textiles magazine issue in 2009 or 2010.   

Paper pieced table mats using glow in the dark threads, FMQ


Wednesday, February 10, 2021

Sourdough Pizza


After a couple of unsuccessful days in my sewing room, I decided to do the second best thing.....bake.

My sourdough starter is only in its second day, so maybe it wasn't quite ready by a sourdough snob's standards.  But, I figured WTH!  I used the discard to make my pizza dough.  It turned out so awesome!  The full sourdough flavor profile was not there, but the crust was better than any pizza I've ever had.  It was chewy and crispy at the same time.  I used the King Arthur Flour sourdough recipe along with some semolina flour.  I baked one on my pizza stone with some "just OK results".  The second one I baked in my Chicago Pizza pan and it turned out perfect.   The first one had salsa, ground turkey, onions and spinach with cheese on hand (gouda, pepperjack and parmesan).  The second one had tomato sauce, onions and spinach with the cheese.  They were both good, but the one baked in the Chicago pan was awesome.  

Pizza Dough recipe:

1 cup sourdough starter or unfed discard

1/2 cup warm water

2 1/2 cup all-purpose flour (KAF)

1 tsp. salt

2 tsp. active dry yeast 

In a small measuring cup, bloom the yeast in a small amount of warm water and 1/2 tsp. sugar.  Set aside for about 5-10 minutes.  In a mixing bowl, measure all other ingredients and finally add in the yeast mixture.  Stir together until all flour is moistened and leaves the side of the bowl.  Knead by hand for 7-10 minutes.  Place the dough back in the bowl and cover loosely with a towel and set in a warm place for 1-2 hours or until doubled in bulk.  Punch down and divide into 2-3 portions for the pizza crusts.  Sprinkle the work surface and pizza stone with semolina flour.  Shape each dough portion into a circle.  Bake for 7-10 minutes at 450°F.  Remove from the oven and top with cheeses, vegetables and meat (if desired).  Bake 15-18 minutes to brown the crust and melt cheese.  

It's starting to get nicer outside.  We've had sun all day.  My Camelia's are blooming and I should be out doing a little yard work.  I cut back our two fence monsters and our 7 Crepe Myrtle's a couple weeks ago and my hand still hurts from the pruning.   Having said this, I think I'll stay in and do some reading instead.  


Monday, February 8, 2021

Anger Musing


Over the last 45 years, sewing has taught me a lot of life's lessons.  Today, I've had to rip out too many seams due to sewing angry.  Never sew angry.  I stopped in time to keep myself from sewing right through my finger....time to take a breather and cool off.  I don't think sewing releases stress either, it just makes you more stressed and causes aches and pains in the joints, in the nooks and crannies of the body.  Yep, I gave up on sewing today.  Had to escape these walls.  Get out.  I put my gear on and headed out the door for a nice long walk, by myself.  To think.  Reflect.  Breathe.  Stay silent. 

Like the seam I sewed angrily and had to rip out.  How do I take away what was said?  Sewing a new seam is easy.  Faintly recognizing the minute holes left behind by the bad seam.   Words are like that, they resonate even though they were said an hour, month or years ago.  Words are the tools when distance separates.  Two words like "I'm sorry", isn't enough and certainly doesn't address the problem.  It's a start to a calmer conversation, you hope, but is trust lost?  Is confidence and respect lost?  If, that is, you ever possessed it?  

Trust is something you gain.  Respect is something you earn and give.  Confidence, however, is built.  To build it, you have to be seen, put yourself out there, be vulnerable.  Learn from failure.  Surrounding yourself with like minds, being open to critiquing criticism and growing from it.  Tools to ply both physically and mentally.  Confidence is a hard thing to build and can be torn down in an instant and sometimes on a daily basis.  In my experience, women of my generation have trouble with confidence and it's due to several issues.  Mine is congenital.  Suppression was a daily struggle in my childhood household.  Unfortunately, I carry this baggage around with me even today.  Whenever I speak to the last surviving parent I have, it comes flooding in spewing negativity and vile puss all over again.  These three things; Trust, Respect and Confidence...I've never possessed with direct correlation to this parent. 

Like a child, I retreat.  I become numb.  Silent.  Submerging myself in myself.  

I want to create;  expressing my emotions.  Not fully knowing where it will take me or how hideous it may become.  Facing the scary.  The horror.  Can I conquer the monster in time before I lose time?   If I create from the anger, will I finally be rid of it?   Getting it out away from within.  My hope is to embrace what remains.  Beauty.  Calm.  Peace.   


Monday, February 1, 2021

Glass Birds

 Last night I finished the yo yo runner for my DS.  It always feels good to finish something, even a small table runner.  

Moving on to another UFO on the list.  This one has only been in the UFO basket for about a month.  The famous glass artist, Oiva Toikka (OT) of Finnland, produced many beautiful works of glass art during his lifetime.  I came in contact with his work while living in Germany.  He had a way of making the bird look simply shaped, but adding metallic accents and color for texture.   One day while window shopping, I spotted a beautiful glass bird made by the artist.  It was a fat red bird with a metallic head and spotted with metallic glass in the body. Of course, I couldn't afford to purchase it.  That was over 15 years ago and I still remember it.  About a month ago, I saw an article to challenge yourself making a small piece interpreting your favorite artist (not necessarily a quilt artist).  So, I chose OT and his glass birds.  

I've been saving silk fabric pieces and silk threads for years, so I chose some of those.  I also wanted to use the foiling technique again, so added that to it.  The background fabric is a dyed piece of cotton I did last year.  I had a piece of Angelina fiber that looked metallic, so I wanted to use that for the beak.  All these bits came together and I went to work on drawing out a bird representing OT's work.    


This is as far as I've gotten.  I may do some altering (ripping out).  The pieces are simply appliquéd using monopoly thread, but I don't like the look, so I may try the silk threads.  I also want to do the trapunto technique.  When finished it will just be the size of one of my post cards.  


Friday, January 29, 2021

A Runner and a Loaf of Bread

 Working on another UFO today.  Maybe even finishing it.  I have it all laid out to hand sew/tack the edges to one another not in it's entirety.  It actually is sewn up to the final outer 2 - 3 rows.  


It's funny, seems quilt trends go in and out of style just like fashion.  I haven't seen a yo yo quilt (or a large or small project made with them) in years.   It will be all the rage soon, I have no doubt.  LOL This one is for my DS to use as a table runner in his living room.  He likes the Asian themed fabrics and colors.    I've had to make more to enlarge it, but they ended up to be a little smaller diameter.  However, it looks more interesting than all one size yo yo.  

This morning it was 29°F, but it feels colder than that.  Nothing warms me up like a good fresh homemade loaf of bread and homemade soup.  The whole house smells so good. 

The sun is making its way through the front windows, perfect place to sit and sew.   

Thursday, January 28, 2021

Second Nature

 Here we are at the end of January.  Wow!  I was gung ho on joining 2 BOM's; The National Quilt Museum facebook BOM and my local guild's BOM.  Also, the Patchwork and Quilting UFO group on facebook, and  a Mystery project for March in my local guild (which I haven't chosen fabrics).   Not to mention the ongoing charity projects I do every year.  Maybe I've over-extended myself a bit.  That procrastination is creeping in.   I can say that I am on track, and completed 2 UFO's this month and month 1 of both the BOM's.   But, I can see already that this could lead me to burn-out!  

I really want to start on some art quilt projects I've been thinking about....and subsequently putting off.  I'm starting to realize that improv is so much more exciting to me and to give up on precise piecing and measuring is the direction I really want to go.  I love the intuitive freedom of abstract piecing and want it to become second nature.  


These two placemats were completely done in one day.  

Improv has become more and more popular over the last few years.  There seems to be many people demonstrating the same thing on youtube and writing books about it.  My exposure to improv started years ago with Gwen Marsden.   I've also studied the Gees Bend quilters and see some differences in their techniques and motivation.  I especially like the teaching style and techniques by Sherri Lynn Wood. 


To me, improv is going with your gut (or really your brain).  How does something look as you go.  No plan, no size restriction.  Take it where it goes.  Add, take away, etc... There's a difference between improvisational and free piecing.  With free piecing, you could be creating from a drawing and using general scissor cut shapes to piece.  You have a plan in mind.  Maybe creating a landscape.  The shapes are general curvy strips, sewn and framed to represent the landscape.  With improv, you are starting with a concept like a strip set and cutting a shape from it, adding a strip to frame it, or cutting another shape to add to it and not knowing where you're going with it.  Along the way asking yourself, "do I like it", "what can be next to it", "should I take it away" always moving on.  I NEVER seam rip an improv.  I may cut it up or add to it, but NEVER rip out.  This is inhibitive and frustrating.  If this sounds foreign to you, that's OK.  This is how to learn and grow into your art and style.  


So, I don't think I'm wasting my time with the other things.  It is good to keep in practice and build skills.  
 

Catherine's Wheel

 I posted December 17, 2020 about making an ornament which is called prairie wheel (USA) or Catherine's Wheel (UK).  The latter being of...