Saturday, December 19, 2020

Twenty Twenty - My Year in Review

 Here we are coming to the end of the worst year in recent history.  I don't want to write about what we all know...the pandemic, riots, shortages, weather extremes, fires, job losses, deaths.  These things are devastating and we've all been finding our own ways of coping.  Instead, my year in review is about what I've tried to accomplish in my quilting.  

I attended a retreat our guild put on in January.  While there, I worked solely on a quilt for a friend. 


I loved how this one came together.  I used William Morris fabrics and FMQ an all over meander pattern.  

At the end of March, the National Quilt Museum's Block of the Month facebook group finished up round 2.  I received a special label for being one of 1,000 people finishing their quilt.  


Amazing blocks by some inspiring quilters were presented each month with their techniques.  I added some embellishments like embroidery and applique to some of my blocks giving it a South Carolina theme.  


The National Quilt Museum facebook group didn't start round 3 in April as in the past two years, instead they chose to do a Quilt Along for 6 months finishing in October.  They started off with a center star pattern and worked out from there adding borders.  I chose a Patriotic theme so I could gift it to my DH for Christmas.  


This quilt measures about 62" square and is a good lap size.  It was sent to a friend to quilt for me in a star and wave design from edge to edge.  I attached the binding and the label on the back is hand written with details and the Air Force song.  The back is pieced with an Eagle and flag panel, navy blue and the label.  
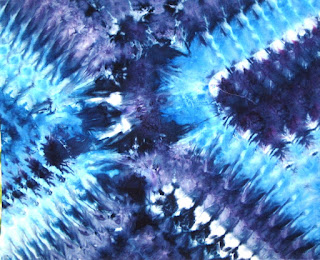
I also had long bouts of ice-dyeing and even taught a couple people, socially distanced, in my home to do this technique. 

I had two students who made these pieces.   They did quite well for their first time at dyeing. 

These pieces I did at intervals trying different dyeing techniques and ties.  My favorites are here.  I also sold some pieces to friends and guild members.  


Every Christmas I try to craft something new.  This year, I found instructions to make sock Gnomes, so I made a few and posted previously about them.  

I've also made some ornaments for our trees.  After all this, there's no wonder why I'm a little burnt out on quilting and crafting.  I'm taking a break for the next few weeks left in this year.  

The American Patchwork & Quilting facebook group will be starting the next UFO challenge for 2021 starting in January.  You can find out more HERE

I am waiting until after Christmas to make my list.  That will be a good time to clean and arrange my studio before starting the next project.  

Thursday, December 17, 2020

Catherine's Wheel and more


Easy to make Catherine's wheel ornaments using just 12 - 2.5" squares of fabrics and a padded pillow center measuring 3" diameter to attach the folded squares to.  Fold each square corner to corner, then again and again so you have the raw edges on one side only.  This is the side that is attached to the pillow.  Straddle the triangle over the edge of the pillow and tack in the center through to the other side.  I usually tack it there twice.  Move on  to the next triangle alternating colors if that's your desire.  Adjust each point so they are fairly equal distance from each other.  Tack the center well.   Add a button to hide your tacking stitches and attach a hanging string inside one of the straddled edges.   Sometimes I use a small dot of hot glue to secure the inside triangles. I've been busy this year with making small ornaments and projects to use up my scrap stash.  Seems like I make more scrap in the process.  

Turn a fabric hexagon into a folded star ornament by cutting out a hexagon twice the finished size needed.  Mark the center of the hexagon and the centers of each straight edge.  With a needle and thread knot through the center of the hexagon and pull thread through each center mark of the straight edges.  Pull tight and push down slightly.  This will pull up the hexagon and you'll have petals that will be folded downward and tacked into the center.  Tack each one down into the center point and attach a button or bead to cover your stitches.  

These mug mats are easy to make up.  Sew strips to a square foundation in your color choices.  Add some details to their face.  Use stitching to embellish the beards or features.  Square up add some batting and a fabric backing.  Quilt and embellish with buttons or embroidery stitches.  These are so cute and went together fast. 

Every Christmas I try to make ornaments or useful items like mats for my table.  It gets me in a cheerful mood and brightens up my décor.    
Happy Christmas and happy sewing.  :o) 


Saturday, November 21, 2020

Sock Gnomes

 Every year I decorate the house around the second week in November.  This year is no different and actually, because of the lockdown, I was more excited than ever to get some cheerful decorations up.  There are a lot of patterns and ideas out there and some are free.  Here is a Gnome decoration I modified slightly.  You can use any supplies you have on hand.  I don't like to spend a lot of money on homemade decorations.  Use up some left over yarn or wool scrap for his beard and hat.  


Start by raiding your husband's (clean) sock drawer, somewhere in there he's hoarding a holey pair that would be a perfect Gnome.  Tube socks are the longest and would make the tallest Gnomes.  You can also use dress socks, maybe an old holiday pair with a print.  Don't use shorter socks.  I used a mid-calf pair that had holes in the toes.  By the way, you can make 2 Gnomes from one sock. 


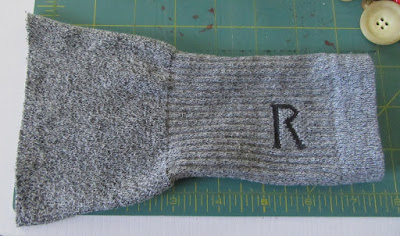
Cut one sock about 7", save the rest for a slightly smaller Gnome.  Now you'll have an open ended tube.

Sew the non-ribbed end shut by turning inside out and hand stitched or machine stitch closed.  Turn right side out.  Stuff the bottom with about a cup or so of crushed nut shells, rice (freeze for a couple hours to kill any bugs) or poly pellets.  Stuff the remainder with poly-fill stuffing or I used leftover batting scrap.  


You don't have to stuff too firmly as it may be hard to fit the hat on and the hat may sit too tall and pointed.  I like the slouchy look.  Using kitchen string, carpet thread or yarn; tie the top of the sock tightly.  

For the beard, I used bits of sheep wool from a farm I lived next to for years.  You can use fake fur, white cotton batting bits, wool felt, yarn or craft stores sell Santa beard fiber.  Using a hot melt glue gun, carefully start gluing your beard bits on.  I use a pencil to hold it on a few seconds to avoid burnt fingers.  Apply your hat with hot glue up to the beard and slightly angled to the back.  

I used an old pair of crocheted socks for 2 of the hats and holiday print cotton fabric for the other two.   If you're using a knitted or crocheted pair of socks for the hats remember if you cut them into a shape, they will unravel like crazy and probably not be useable.  I just turned them inside out and machine stitched a triangle by laying the sock flat measure by eye how tall you want the hat to be and sew from the right edge angling as you sew to the left edge.  Do not cut away the rest, even if it's tempting.  Turn right side out, poking around to make the tip of the hat a little pointed and the extra is not too bunched up.  This will add a little weight to the hat and make it slouch nicely.   


For the nose, you can use a large bead, wood ball, pompom, make a stuffed round piece from cotton or knit fabric.  I have loads of buttons, some have shanks which work really well.  You can tack the button in place with thread, but my glue gun was still hot, so I glued them.  


This is the other half of the sock.  Examine for holes and repair them before stuffing with pellets and scrap. 
Tie the top and trim off the excess sock as this will be hidden within the hat, but the excess may make the hat sit too tall.  Or try it if you want that look.  Make them your own, add some embellishments like buttons, beads or cinnamon sticks.   I think this was such an easy fast (literally took minutes) project/craft for the holiday and one more plus...I would say kids could join in making these.   Enjoy!  

Labeling Quilts

  It's sometimes an afterthought to add the label after completing the quilt.  Most times, sadly, it's never added and the informati...