I took one of the pictures I posted the other day and made a rough sketch, picturing in my mind what elements I want to convey, textures and techniques to work on including threads and any other elements.
The sketch is just a rough estimate of where I want to place my elements. I've drawn the tree larger and forefront so it looks more substantial than in the original picture.
The next thing is to choose the fabrics in the colorways that closely resemble the original picture, but not exactly and you could actually change any of them or add a different color. The cream on cream fabric is used as my foundation. At this point I could have drawn onto the foundation to show where the placement of my elements will go. However, since this only measures around 11" square, I thought I would just eyeball it.
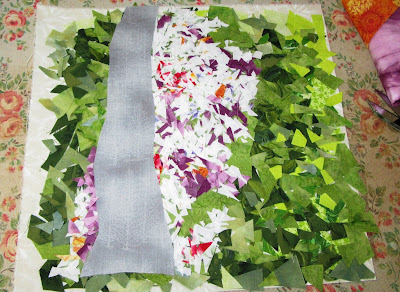
Then, working from the background out as if it were a 3D form, lay the foundation piece which is cut roughly to your desired size (mine is 11"). Then lay on a piece of Steam-A-Seam 2 (SAS2). Now, place your background color element, tap down slightly to make it stick. I used the snippet technique. This requires no measuring, no specific shapes at all, just start cutting keeping them fairly small overall. I used at least 6 different greens. The SAS2 product is sticky before ironing and allows you to change position of any shapes before ironing down. My greens are cut in snippets, no actual shape, although some look like tiny triangles, or size. The large green area in the center of the background is where the flowers will go with some of the green peeking through. I could have cut this green piece into snippets as well, but thought this would be easier to manage and place down the flower elements.
In this picture above, I am showing the addition of SAS2 on top of the large green element for the tree placement and the flowers. In hindsight I might not have used the Steam-A-Seam 2 product here as stitching through 2 layers of glue is a technical issue, but not impossible.
Now, I've placed my tree trunk to the left on top of the SAS2. I've snipped the flower colors and placed them around the tree almost forming a path. Take a flat edge (I used my bone tool) and slightly push a few snippets under the trunk edge, just so it doesn't look like a defined line.
Using a clear or white see thru organza, cut a rough 11" square and place over the piece. Make sure this is how you want it, you will not be able to change anything after the organza is sewn in place. Cover the top with a pressing sheet and gently press and hold for 8-10 seconds so the glues will fuse underneath. Remove the pressing sheet and carefully transfer it to your sewing station.
Choose what types of threads you want to use. I used variegated cotton, variegated polyester, and solid cotton threads in 40 weight. Now, use a piece of batting or wadding of your choice. I used a product called byAnnie Soft and Stable. It is used for tote bags and such.
Sew all around the edges to secure the organza.
Thread paint or sew down as you wish. I used free motion quilting stitches on the snippets and changed to a walking foot for the tree trunk.
This is as far as I've gotten on this piece, but it is not done. I am thinking of adding some beading and possibly another element on top, but in the coming days I'll get back to it and play around with it.
As you can see, this is not an exact replica of my original picture, it's merely a representation.


.jpg)
No comments:
Post a Comment