Friday, March 31, 2017

Inspiring air and space museum

 Just a little inspiration from a recent visit of the Air and Space Museum at Petersen Air base, Colorado Springs...
The terminal was built in 1941 and was Colorado Springs first airport terminal.  It has stylized eagle entryway and art deco architectural detailed features. 


Adjacent to the air base is this structure..."Airplane Restaurant"  Covering the walls, nooks, crannies from the ceiling to floor are artifacts of flight, signed photographs and amazing history.   You can be served on the plane in retrofitted booths.  

Interesting shots taken by my DS.  This museum had artifacts from WWII to the Cold War.  The evolution of flight and communications was interesting.  In the Broadmoor hangar, you will find displays, a fighter, and a test simulator for airmen going to missile silo duty. 
In the Broadmoor Hangar...
Test Simulator
EB-57E Canberra

EC-121T Warning Star or Conny as they call it.  This was a flying radar ship that tracked enemies and directed our fighting resources.  
CF-188A Hornet


You can visit this link to find out more information on the Peterson Museum


Sunday, March 19, 2017

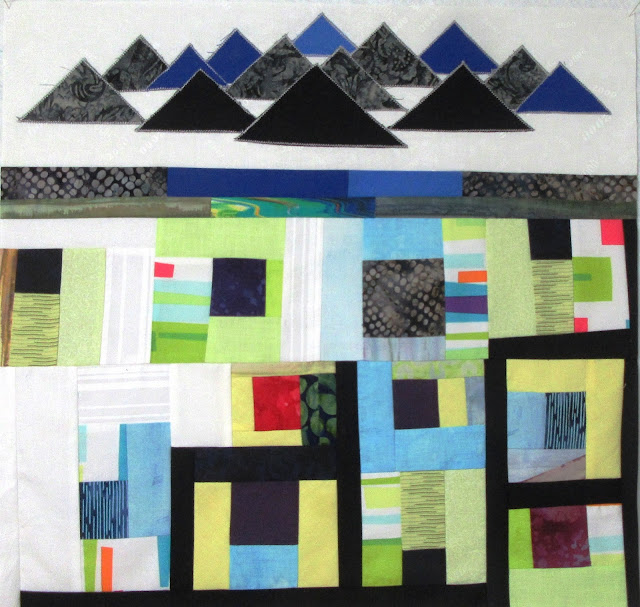
Colorado Improv quilt

I started out with a basket full of scraps.  I dumped it out on my studio floor and sorted them by color and by solids, setting the solids aside.   Seeing the strips and squares I had, I decided to make a scrappy improv quilt for my DH with Colorado as my inspiration.  He has a view of the mountains on his way to work everyday along with the lights of the city and freeways surrounding the area.  Crudely, I drew out an outline sketch of this idea in my journal.  In the sketch, I knew I wanted the Rocky Mountain   range and some city elements.  So on the design board, I placed some triangles for the mountains, and placed squares with surrounding strips to represent city blocks.  The solid strips were added after the city blocks were decided on.  


Working from the top, I broke the elements down into sections to sew.   The first section was the mountain range on a white background.  I will thread paint the snow caps before sandwiching together, but to apply them onto the background, I used glue stick, used dryer sheets for stabilizers, and machine applique techniques.  Layering from furthest to closest,  I sewed down the furthest mountain using a zigzag stitch, then laid down the next mountain until finally the closest mountain was stitched.  They look like they are floating in the air, which is fine to me, they look this way sometimes when the weather is foggy or snowy.
 The next section was the grassy/water section. There are valleys and meadows with reservoirs and lakes around.  I sewed these strips together in a staggered fashion so no seams would match.  
The hardest section was the bottom section which represents the city and streets.  The solid strips break up the city blocks.  I moved these pieces around quite a bit until I was pleased with the layout, then sewed them into row/blocks.  

Again, trying not to match any seam sections so that it can look as scrappy as possible.  These sections were sewn together then, squared up with a rotary cutter.  Now, I am contemplating the quilting and backing.   I will not bind the quilt traditionally as I don't want a bound edge even if it were pieced to match the different colored edges.  I will sew using the pillowcase method, then quilt the top.   For now, it's hanging on my design board.   My DH is patiently waiting for the outcome and I hope to have it ready by his Birthday in a month.  This piece measures 24" almost square and will hang in his work place.   It looks similar to the other improv pieces I've done and I would say I've exhausted this technique and want to move onto other techniques.  
DS is coming in today so we can spend time together.  It will be so nice to have him stay with us.  He is wanting me to finish the Blue Sapphire quilt so he can hang it in his place.  Since my foot has been bothering me, I haven't done much sewing/quilting in the past 3 or 4 days.  Seems longer, but I know I should rest it.  :o)


Friday, March 3, 2017

Quilting - Blue Sapphire UFO


I just purchased a #15 foot for my Bernina.  Using the BSR feet are OK, however I wanted this foot to replace an embroidery foot that broke a few years ago on me (#29) which had a clear plastic oval presser.  So, I dug out a UFO waiting for machine quilting and went to town free-motion quilting the top with clear polyester filament.   My results so far are excellent and I love this foot.  


As you can see here I thread basted my sandwich together.  Big mistake, but I knew we would be moving and I wouldn't have time to quilt this right away.  It takes time to pick out the basting thread and sometimes can get stuck in the quilting stitches.  I usually pin baste tops I plan to machine quilt.  The pins can leave larger holes than needle holes, so I try to pin baste just before quilting, not letting the top stay too long with the pins.  Oh yes, I have done that before as well.  Big mistake...holes are unsightly, but most did disappear after a gentle washing if you are able to wash.  Personally, I don't recommend washing an embellished or art wall hanging.  


This quilt started out as an experiment.  The experiment (or challenge) is to make a perfectly circular piece and applique it onto a whole-cloth piece.   The pathway to the left was also a challenge in that I had to piece different blue fabrics in slashed bits that would meander like a path.  I used freezer paper to help me shape the pathway and cut it, then appliqued it onto the whole-cloth piece. The machine quilting is just free motioned, no planning, no marking...just whatever I fancy on the particular day I work on it.  
The round appliques have intersecting lines in a cobalt color polyester thread, so it gives off a sheen.  The pathway and echo next to it is also quilted with this thread.  


 Here is the back of the quilt so far...

After looking at these pictures, I'm thinking this needs another challenge.  Beading?  How about surface design interest like painting or stenciling?  I know, I've already started the quilting, but I wouldn't be saturating the top...and it's just to see if it would work.  It's an after thought, but it wouldn't have to look that way...or so what if it does, it may be a good thing.  This is just an experimental piece and it may turn out to be a work of art.  

I've made a commitment to myself to work on a UFO at least one hour everyday so I can possibly finish the projects in my UFO basket.  Maybe even by the end of the year.  So far, I've been able to keep this commitment, however warmer days are coming and the garden will need some attention soon.  For now, I am going to keep at it.  :o)  

Labeling Quilts

  It's sometimes an afterthought to add the label after completing the quilt.  Most times, sadly, it's never added and the informati...