Wednesday, April 27, 2022

Applique a Bee

 The warmer spring weather brings out the blooms along with the bugs and especially the bees.   To me they're fun to watch as the hover around me when I'm on the patio.  We have a yellow jasmine on our fence that's full of buds and I think the bees are patiently waiting for their blooms.  

The Virginia Quilt Museum in Harrisonburg Virginia has put out their 2022 mini challenge schedule where you can submit 15" quilts to be displayed and sold - or not, they will mail it back to you when the exhibit ends.   Go HERE to learn more.  

For the summer exhibit, I wanted to make a mini with large blooms and a bee in flight. Even though the flora and fauna category was for the spring exhibit, I enjoy summertime blooms.  Click here to see the schedule for the mini challenges for 2022.  

I drew a rough sketch of some Asters.  

And I had some reference photos to get some ideas.   


Originally, I thought green was going to be the background.  Once the flowers went on, I didn't like the green and the flowers looked like they were just floating.  I took my scissors and started cutting away the green saving some of it around each flower for leaves.  

The brown grid batik was an experiment with bleach and I didn't end up using it, so I kept it for a future use...now... as the background for these flowers.  


I chose the arrangement and sewed a straight stitch around each flower and leaf combination using polyester monopoly thread.  

I drew out a bee onto paper and then copied it using a lightbox onto fusible.  I thought about embroidering the entire bee, but ultimately choosing applique.  So, each component of the bee was traced onto fusible and I chose a black cotton for his body.  The yellow/gold is lame.  The wings are a blue hue of organza.  I used silk thread to attach the wings and add the lines.  

I thread painted the flowers with variegated threads and metallic thread.  My bee needed more so I added his antennae, eyes and a center square of lame. 

I think I'm happy with it and now it's on to finishing with binding, sleeve and label.  


Tuesday, April 5, 2022

NQM round 4 March and April

 The National Quilt Museum's Block of the Month Facebook group put out the March block on the first of  the month.  I took my time deciding what to do with it to fit into my theme this year.  In the end, I chose to do Jacobs ladder with 2 Angel silhouettes on the rungs leading to heaven and the dark Angel descending into hell. My ice-dyed fabrics worked very well for this block.   The technique used was an improv style cutting and assembling, but I had some control with my cuts to show more perspective on the ladder.  The appliques were easy simple shapes hand sewn and afterward I added some thread painting to the wings (not shown in the picture). 


The April block has been released and I'm trying to come up with the next "element" for this month and what the design and color combo will be.  The sample given is the furthest it could possibly be from my theme....a folk art design with applique's and a checkerboard border.  I like the idea of a pieced background/border, but NOT in contrasting colors and possibly on one side of the block not all 4 sides.  Subtle changes in one color would be interesting instead of a solid piece of fabric.  I can manage that.  But, the applique may take some thinking and sketching.  

As I'm writing this, I hear the rain pouring down outside with intermittent bouts of thunder and lightening, actually it's lightening and then the thunder.  Loud cracks of thunder.  So, I've unplugged my machines and turned everything off sitting in my walk-in closet waiting for the all clear to come.  We're in for some tornado weather today.  

I'll grab one of my journals and do some sketching, perfect time.   

Thursday, March 17, 2022

Getting UFO's done

 I've been working hard at spending at least an hour in my sewing room everyday working on the UFO's I've accumulated.  Finishing 4 of them at retreat and mostly thread painting and FMQ this panel wall hanging.  I found this one a good practice piece for thread painting and will give this away.  


These little projects were done at the retreat.  The midi bag was a kit I bought way back in 2013, so I'm very happy to get that out of the UFO basket and done.  

The last thing I want is to squash or diminish my own artist journey.  I look back on the last 5 and even 8 years and I see a change in my work and my goals.  Looking back in my journals and I see a lot of ideas, sketches, even doodles that would be great places to start elaborating on a new venture in an artistic piece I would be proud of.   Being bombarded by pattern made, designer created/recreated, BOM's, kits, step-by-steps, etc... all the time is becoming frustrating for me.   This is just reproducing a pattern for the masses.  I am more interested in creating something original without the ability to re-create it over and over again. Unpopular thinking....I know!  But, this is me, this is the way I feel.   I've known that I have to do what makes me happy, not crazy.  Whether it's popular or not, who cares?  


In the photo above, the postcard is made from silk and foil with thread painted areas, applique on top of some hand dyed fabric I made in 2020 at the onset of the pandemic.   The subject being a Finnish glass artist who produced numerous birds in his lifetime.  

This year, the National Quilt Museum's BOM on Facebook is in round 4 and it seems they have chosen an artistic edge to the samples the designer's have made so far.  I am using all the ice dyed and hand dyed fabrics I've made over the last 2 years.  It will be interesting to see how it comes together.  I've chosen the natural elements as my theme for this quilt.  January's block turned out to be artic glaciers under the aurora borealis...


February's block showed the discharge dyeing technique, so I chose sound waves and used paint on the fabric after discharging an outline of the waves...But, I may choose a sample I did of a leaf design, haven't decided quite yet.  


For March, I want to do a block that connects heaven and earth like Jacobs ladder.  I haven't started on it yet, but the ideas are fading in and out of my mind.   It's time to start on one of these ideas and run with it before this month is over.  With the block of the month, it can be exciting to see one at a time and work on just one at a time.    

Thursday, January 6, 2022

New Year

 Happy New Year (a few days late)!  I can't believe it can be 2022 already.  Like a lot of other quilters, I've made my UFO list with good intentions of working or completing one or more every month for the year.  I can gleefully say that I have finished one item from the list this early in the year.   It started out as a fused stained glass block.  I added machine applique, sandwiched and quilted the square and made it into a pillow.

I finished the stained glass block into a 22" square pillow.  The ice dyed fabrics used are my own. 

I love the back of this pillow.  My medallion ice dye looks like an Indian headdress to me.   

I hesitate to join in the National Quilt Museum's Block of the Month program on Facebook for 2022.  This is round 4 and I've participated in every one of them since the very first one, even the Sew Along.  I love the learning ability and process, but tired of samplers which are made into wall hangings.  I simply have enough of those.   But, having finished the pillow and seeing my ice dyes in blocks, I may have to go ahead and do one more year in these fabrics.  I have so many now.  

Another UFO on my list is an orange and teal improv piece.  My improvs are sourced from my scrap bag so they start out pretty small.  I'm trying to be better about using larger pieces and shapes.    


The black pieces are added to break it all up.   Some of these are sewn into larger sections, but now I may add a lot more black and introduce a new color or two.    There is no set direction for this, I just want to keep working at it and see how far it goes.  Maybe it will be a huge quilt, or maybe I'll keep it small and make it into a usable piece of art like a tote bag?  No.  Huge.  For once, I want to go HUGE and see if I really like it.  Most of the time I put the skids on size because it's a LOT of work, sometimes boring and exhausting work.  This is why I absolutely hate pattern making.  Some designer creates a pattern and sells it for anywhere from $15 upwards to $$$ and to me it's just duplicating over and over the same thing.  I get bored with repetitive patterns.  What's the point?   With Improv, there's no pattern, few rules and all the freedom I want.   But, having said that, yes, I have made quilts and things from a pattern.  It's just not something I would do all the time.  Actually, it's hard for me to be proud of doing one of these repetitive patterns.  Originality, artistic, freedom, play, intuitive piecing...this is what excites me.   

FMQ (Free Motion Quilting) is also my "thing".    I love sitting down with a blank quilt and just starting somewhere around the middle working my way outward.  Usually thinking about what I want to fill the space with and go from there.  


This was a BOM last year.  I call it "Butterflies in Flight".  It's hard to see the FMQ, but the entire quilt was not marked beforehand.  It's a lap size just for me, I wont be giving it away.   

It's January, lots of projects left over from last year and a few from past years, so my focus remains on finishing UFO's.  If I decide to do the NQM-BOM, I'll use fabrics I have on hand and/or the iced dyed fabrics I made last year.  The improv orange and teal UFO will be my focus this year and I hope to add on to it, but we'll see.  


Friday, May 21, 2021

Quilts blocks in May

May is here and the flowers are blooming!  After working in the yard, getting it ready for the growing season ahead, I got to thinking about making some flower blocks.  I joined in on one of Amy Friend's swaps from her Petal+Stem book using FPP.   She's into round 3 of the swaps, but I didn't sign up to swap anymore.  Instead, I will make some from my fabric stash of ice dyes produced over the last year.


Here are 4 blocks I've completed.  The flower pot block is an ice dye that gives rusty look.  The butterfly on the bottom right used 2 hand ice dyed fabrics and the leaf block is also my ice dyed green fabric.  

At the start of the year I signed up to do 2 BOM's, 2 mystery quilts, a challenge mini quilt, UFO challenge and this FPP swap.  It's become too much for me so I dropped the mini challenge and one of the mystery quilts.  This has helped me stay on schedule and focused, however I wasn't able to complete a UFO last month and I may not be able to complete one for this month.  At the end of the year I will just have to carry some over and that's OK.  It's satisfying to complete a project off the UFO list.  American Patchwork & Quilting UFO group does this challenge each year.  Go HERE to find out more.

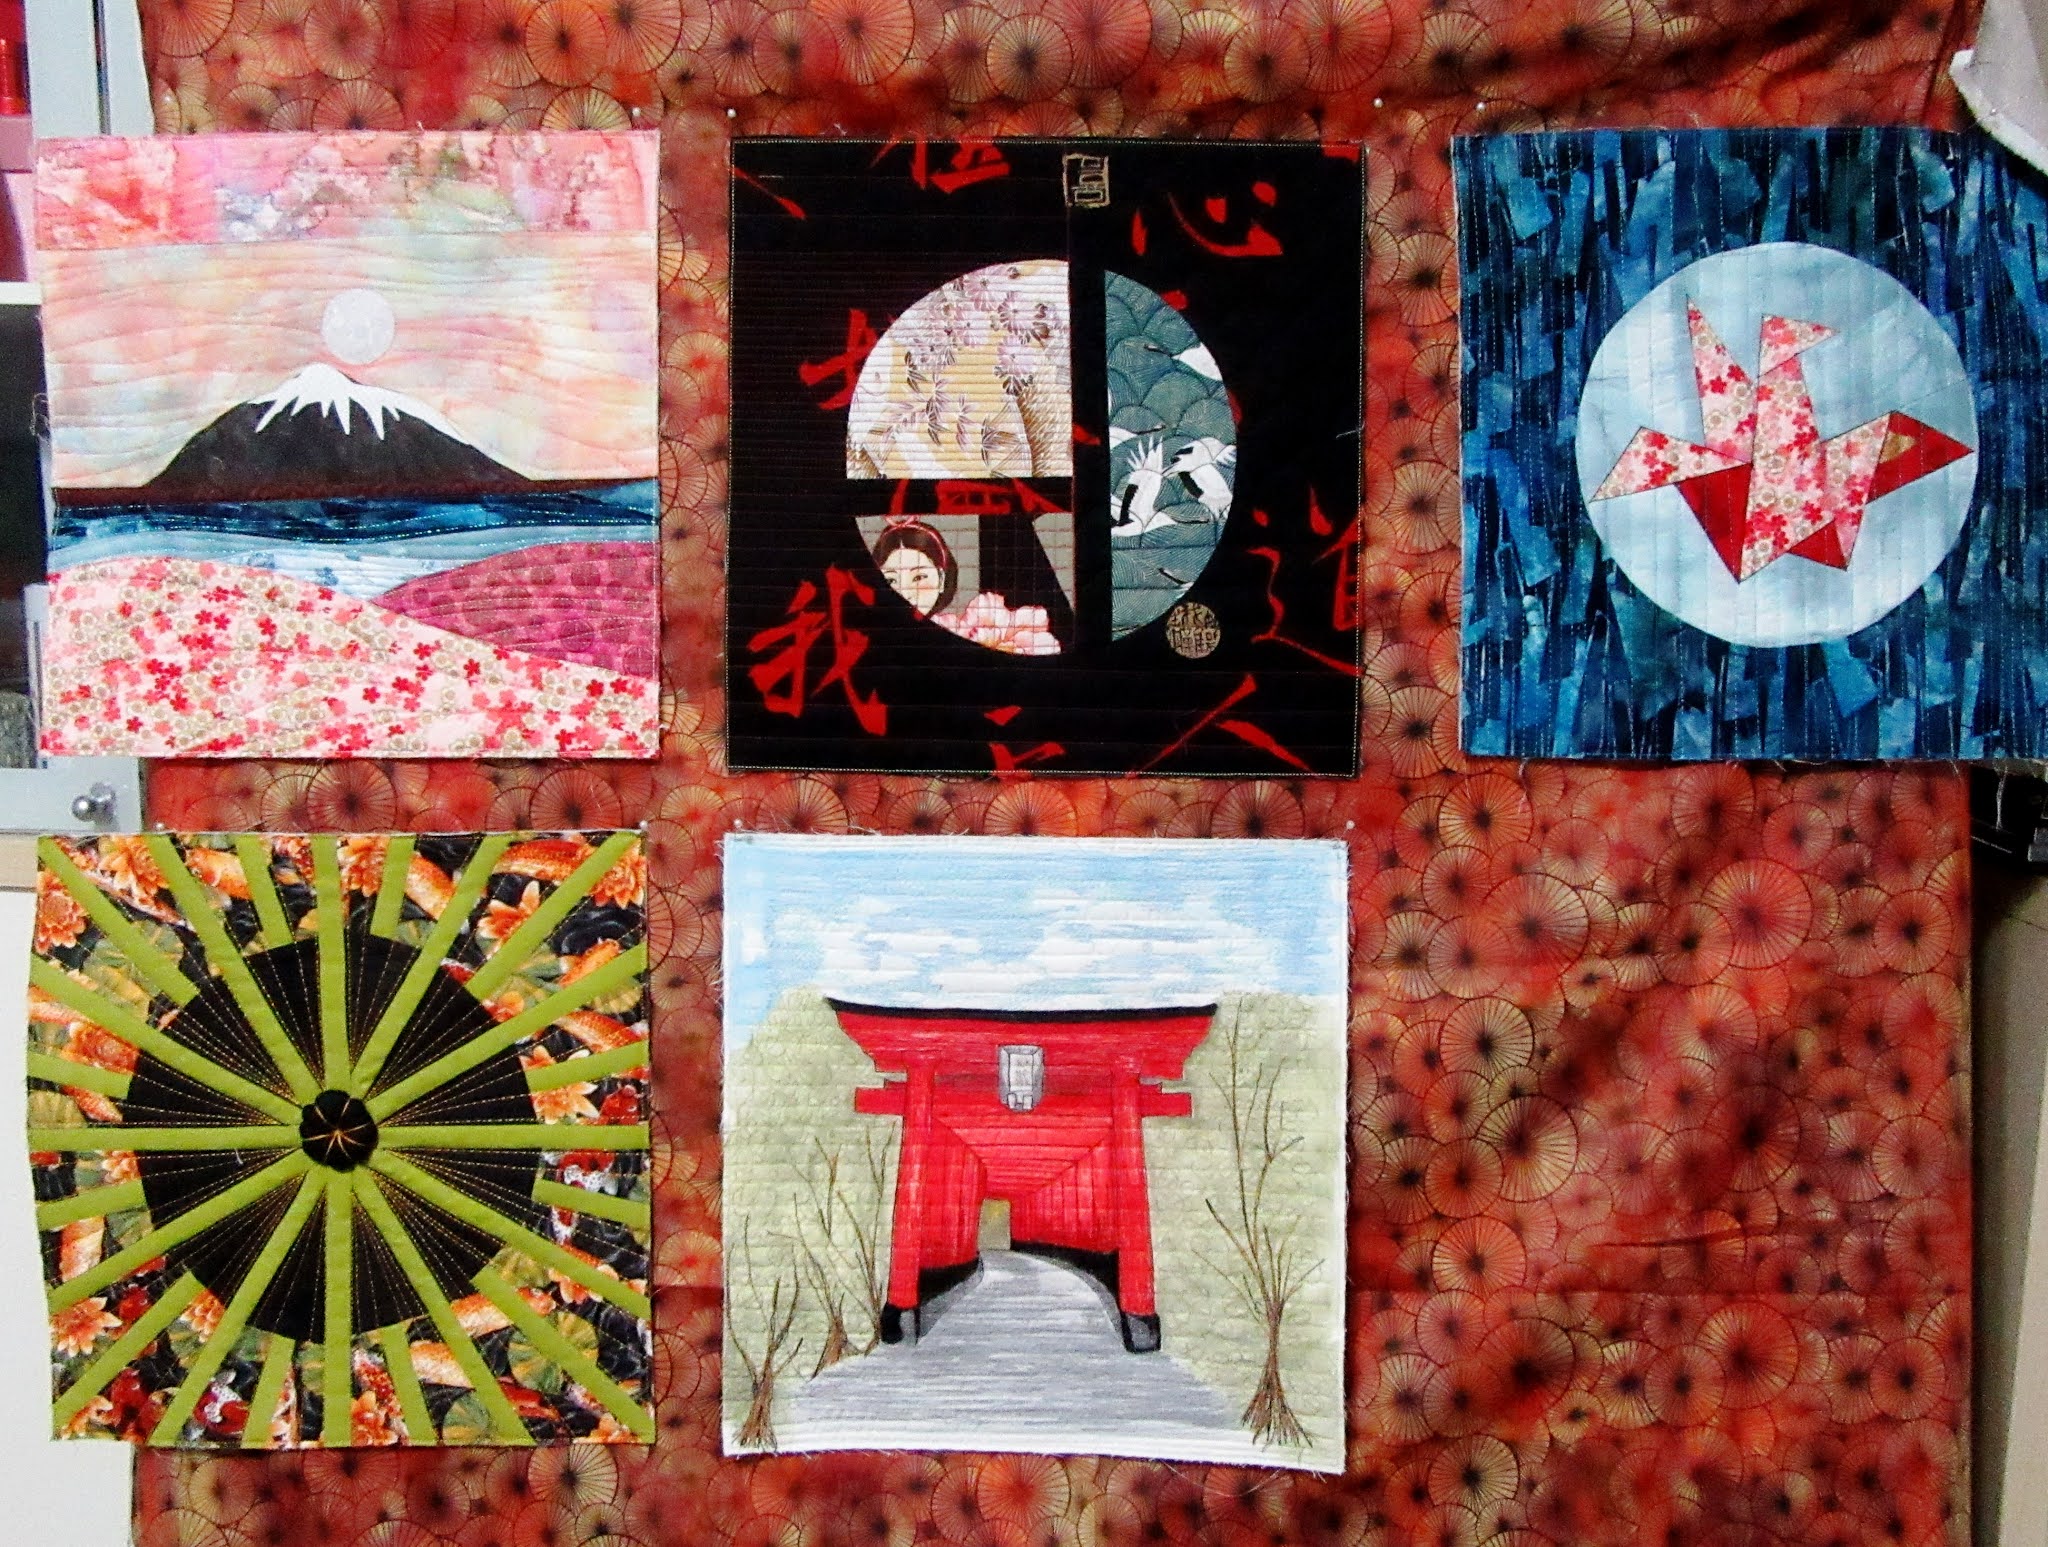
The National Quilt Museum BOM- Round 3 - So far, I've kept my blocks to the theme I chose.  Each month has challenged me to a degree.  One of the challenges for me has been applying the Quilt-as-you-go method (QAYG).  Here are my blocks so far.

                                               January, February and March 2021 blocks.  

January's block included machine piecing and inserting a circle onto the background fabric.

February's block included techniques of machine piecing wavy lines, appliqueing a circle and other elements into the block.

March's block used FPP (foundation paper-piecing).  

                                                                         April block

April's block uses FPP sewn inside a circle and inset onto the background fabric.

                                                                         May block

May's block was created using paint sticks and thread painted on a white background fabric.  This month's sample called for whole cloth quilting.  This is primarily why I chose to paint and thread paint, then quilt it. 


My May block was created in stages over days and days of work.  Starting with my drawing and a white square of fabric that measured 15" square, I traced with a light box with pencil onto my square.  I outline stitched the pencil with black thread.  Using Caran D'Ache NeocolorII paint sticks and Permanent Tulip Fabric Markers (in the end), I painted each area letting the sections dry before moving to another section.  I heat set the entire square and fused my stabilizer to the back.  I inserted it in my hoop and started thread painting each section.  I wanted my paint and thread to show rather than filling in completely with thread, so I only loosely painted with thread and left some of the details out like detailing leaves because the Shinto is to be the main focus.   After all the thread painting was completed, the block was sandwiched between the backing and batting.  Basting spray was applied to hold the layers together while I quilted the horizontal lines which are evenly spaced.  Lastly, I trimmed the block to 12.5" square and basted close to the edge all around to hold the quilting stitches in place and keep the edges clean.  


Each block is quilted and trimmed to 12.5" square and at the end of 12 months the 12 blocks are sewn together with sashing strips on the front and back with a strip of batting between (if needed).  My sashing strips will most likely be at least 3" wide, so I will need the batting strips.  

I'm looking forward to seeing next month's block and how I will fit into my theme.  Since June's block will be the half way point, I will start to think about what fabrics to join them together with and start doing just that.  I could wait to the very end and shuffle them around, but I don't think I will wait that long.  

Sunday, April 11, 2021

Snippets, Crumbs, and Confetti


When it comes to scraps to save, how small is too small?  Well, it would depend on what your intent is.  Do you like scrap quilts using crumbs?  These are pieces as small as about 1.5-2" finished.  Maybe you like snippets size?  These are fairly larger pieces up to around 4" finished.  Confetti scrap is a piece that ranges from .5" to around 1.5" finished.  Finished means you've measured the piece after sewing in the seam allowance.  For quilting, the seam allowance is always a scant .25".  So remember to figure in a half inch to allow for the seams.   

Another way to use even smaller pieces is to use fusible web on the wrong side of your piece and chop it up into snippets.  There is no seam allowance needed as you will fuse (glue) the pieces on and stitch over the top of them.  Layer the bits over your background (paper removed) and arrange to your design.  This is a lot like collage quilts, however the snippets/bits are tiny.   Use tweezers to place the pieces accurately.  Fuse in place when you've completed placing your design down.  Cover the top with organza, if using.  The netting or organza should be a neutral color and sheer enough to see through.  Now you're ready to FMQ or thread paint over the snippets.  This technique adds some texture and dimension, but is only good on Art quilts and would not hold up on utilitarian quilts. 


 The size of this art quilt is going to finish at 4" X 6".  


This is another piece done using this technique.  The black tree trunks are added after the organza/netting.  I started each of these with a drawing from my journal.  The background piece used is muslin, however the stiff pellon fusible product would work too and serve a dual purpose.  You will not need a background foundation piece or the fusible on each scrap.  


Monday, February 15, 2021

Sourdough Biscuits

 What can be more warm and satisfying on a cold winter wet day than a fresh batch of sourdough biscuits and a pot of tea?  I could have this all day everyday.    My sourdough discard is ready to use after 5 days of feeding.  I love its subtle tanginess.  Here's a recipe to try.  These biscuits are delicious with a little jam and clotted cream.  They were gone in minutes.  

Sourdough Biscuits

1 cup all-purpose flour

3 tsp. baking powder

1 tsp. salt

6 TBSP. unsalted cold butter

1 cup starter, unfed discard

1-2 TBSP. whole milk (if needed for dough to come together)

Preheat oven to 425°F.  Grease an 8-10" iron skillet and set aside.  In a mixing bowl, measure all the dry ingredients, stir.  Cube the cold butter into the flour and work in until pea size bits remain.  Make a well in the center of the bowl and add the starter.  Stir together until dough comes together.  Add milk a little at a time if needed.  Turn out onto a floured surface, pat down to about 1" thickness and cut into circles.  Place next to each other in the skillet.  Bake for 18-22 minutes.  Brush with melted butter and serve warm.  


My wrist has begun to feel better, so I am hoping to get back to sewing tomorrow.  Our guild has put out a challenge called "just initial it".  Using only 3 initials from your name, 2 for colors and 1 for the pattern, creating a quilt no larger than 160" total parameter measurement.   I chose "Shaded Trail" pattern and my colors are Purple and Linen.  The pattern is paper pieced and I've never had so much trouble with pp up until now.  I think it's because I cut my strips slightly too narrow.  I am using commercially dyed purple in dark and my hand dye light purple.  If I can get it right, I'll make a table runner.  


Friday, February 12, 2021

Valentine's - not just cards

Happy Valentine's Day!  Some may consider this holiday a "non-holiday".  Just a consumer based card holiday, that is, when people used to send cards.  Well, whether it is or isn't, to me it doesn't matter.  I love Valentine's Day.  I always have.  My parents married on 12 February and I always thought that was such a sweet time of year to get married.  I would spend my own money to buy them a box of Valentine chocolates every year through my teens and the first year or two I was married.  It never went over well in the end.  Hoping this gesture would bring some love and/or happiness to either or both of them.  It didn't.  But, that didn't break me from the hope Valentine's day brings.  To me, it's the opportunity to show the person you love that you care for them, admire them and appreciate them for who they are.  Where did I get these lofty ideals?  Especially coming from such a morose family dynamic. I digress.


When I made this quilt, I didn't know where it would take me.  I started out loving the idea of using "conversation hearts" like the candies.  Using sherbet like colors, not just a pink and white color palette. Each of the heart applique blocks have a conversation line, like "hug me", "be mine", " you're sweet", etc... I also wanted to add the words, "Be My Valentine" using a free piecing technique as described in Tonya Ricucci's book, "Word Play Quilts".   Fifteen years ago, there weren't a lot of options to add words to quilts using piecing or applique, but now there are several books and resources to do that.  I like the free pieced look.  It's not perfect, and that's what I like.  Non-pattern quilts are my favorite quilts as they tell a story of what the artist is saying, thinking, or feeling.  Start somewhere, add something or take away something.  See where your ideas will take you.  


My wonderful DH brings me roses every Valentine's day.  He would bring me roses everyday if he could.  He is a true sweetheart.  He knows how much this means to me.  It's not just a motion to take on Valentine's day, that that is the thing to do.  During our poor years, he would bring me a single rose because it was cheaper.  I would dry the rose and keep it in my journal or in a vase.  It would remind me how much he truly loves me... that he would take his last $3 to buy me a single rose.  Back in those days $3 was a lot of money, especially for us.  

Paper pieced hearts made into small mats/mug rugs

Applique block made for a donation quilt

Quilted needle case using some non-traditional colors.

"Blue Without You" postcard

"My Heart" postcard

"Love Letter" postcard

Multi-medium postcard

These are some of the quilted Valentine postcards I've made over the years.  It was so much fun using some non-traditional materials for these.  The "Blue Without You" postcard was a challenge submitted and pictured in a Fabrications textiles magazine issue in 2009 or 2010.   

Paper pieced table mats using glow in the dark threads, FMQ


Journal mini quilts

                                                                         "Beach Glass mini" Journal quilts are those works of art ...