Thursday, August 29, 2019

Improvisation

I've just finished another improv pieced wall hanging.  The strip sets were sewn together in no particular order.  My limits were to use scrap, limited colors and 3 solid fabrics.  There had to be at least one curve incorporated in the design.  I had to ban the use of rulers, but I did use a rotary cutter and scissors. 

Once I started cutting and sewing, it all just flowed and my decisions were quick, I didn't dwell on a selection long. 

My DH made me a design wall many years ago from a piece of 1" thick foam core board and I covered it with batting.  It is an essential tool and I don't know how I lived without it before.  The wall helped with Improv as I pinned up my pieces and would step back to see it from a distance adding or taking away before cutting and sewing.  Moving pieces to see how it changed the look.

The far right section in the picture above was moved to the left in the next picture, which is what I went with, sewing it in place and moving on to another section. 

This is the final quilt.  I used a teal blue quilting thread and machine quilted free motion curved lines.  To me, the best quality of Improv piecing is that it's NOT a pattern to be repeated.  It's NOT meant to BE something, or a representation of something.
 It's truly ART up for personal interpretation.
Ask yourself, what am I seeing?  How does it make me feel?


Thursday, August 22, 2019

Morsbags


For several years, I have been active with the Morsbag.com global project to make and donate handmade textile bags and bring awareness of the damaging use of plastic bags to our environment.  Usually there is a handout day that's planned ahead of time that takes place in well populated areas.  I've given away bags at event entry doors.  They are never to be sold for profit.  The textiles you use to create them are items that are worn out or destined to be thrown away, or could be newer fabrics.  There are so many good places to hunt for textiles like resale stores, yard sales, even fabric stores that are selling cheap lines or have to give away bolts.  Some beautiful bags have been made from curtains, old quilts, clothing, worn jeans, wool, etc... Please go here to read more about this project and join/create your own pod or get the bag pattern.  These bags will be given away at this event in November while my supply lasts. 


Just my opinion on this topic...Here we are, almost done with August.  It's been one heck of a hot summer but thankful there are minimal storms where I live...so far.  Energy Star recently made a suggestion on the internet for recommended home temperature settings.  Go here to see the ABC news article.   There was a lot of angry discussion over this topic.  Quite frankly, I agree with Energy Star, but there are other factors to consider.  Our home is not energy efficient to start with.  We had to beef up our insulation, get new windows and install an insulated garage door so the heat wouldn't just seep through the house.  Something else to consider is solar panels.  This is costly up front, but in the long run, it will end up paying for itself.  Going green should be something everyone considers, as one person will not make much of an impact on the environment, but as a community, we could make a start. 

Tuesday, August 20, 2019

NQM - BOM blocks 9-12

Though I finished the quilt back in April, I didn't follow up on posting it.  So, today I am catching up.  The designers that National Quilt Museum has chosen to do the BOM has been amazing.  The last 3 blocks are no exception.  Block #9 was a Japanese design by Robin Gausebeck.  This is my finished block.
Adding the sashiko stitching really brought this block to life.  I used a chalk pencil to draw the flowers and the cube shapes, then stitched with Japanese cotton by hand.  Three of the colored squares are hand ice dyed fabrics that I did earlier. 
Block #10 is Hawaiian applique.  The designer chosen was Nancy Ann Sobel.  Her sample was a dogwood, but I wanted to put in the turtle as a reminder of the turtles we had seen while there some years ago.  The turtle fabric is also ice dyed.
Block #11 is the pinecone inspired by Betty Ford-Smith.  This one was very challenging as all the folded triangles are layered making it very heavy and bulky.  Not my favorite block, but it was fun to learn about it.
Block #12 was the Courthouse steps pattern inspired by Kim Niedzwiecki or Go Go Kim.  I enjoyed this paper pieced design.  Each of the logs are super narrow. 
The dark gray shadow really shows off each block giving them a lot of contrast.  
I added a gray outer border and quilted each block with a different design.  The gray outer border is quilted with a feather design.  I finished it by the deadline and received the special label.  

Monday, August 19, 2019

Selvage Edge Piecing - Make a mug mat

Selvage edges can be used in piecing for interesting design and effect in a block or project.  After purchasing your yardage, check out the selvages to see if you want to save them from the bin.  Rotary cut at least 1" into the print so you will have enough to sew onto and leave for interest. 

There are a few books and articles written on this technique.  I have purchased the book by Riel Nason entitled, " Modern Selvage Quilting" published in 2016.  This book explains her method of piecing and 15 projects to make.
About 3 years ago, I made these mug rugs and blogged about them, however since then the post is lost into the ether.  So, if you're interested, I will try to explain the method of creating them.  You will want a wide variety of selvage strips to choose from in varying widths.  There are lots of choices to consider like adding just color bubbles, text, or blanks.  For the size of your foundation square, requisition your strips and set them in the order you want to sew them.  Decide if you want the orientation to be straight across or at a diagonal. 
Cut your foundation fabric from muslin.  These are 5 inches square.  Cut a backing fabric from a contrasting print. 
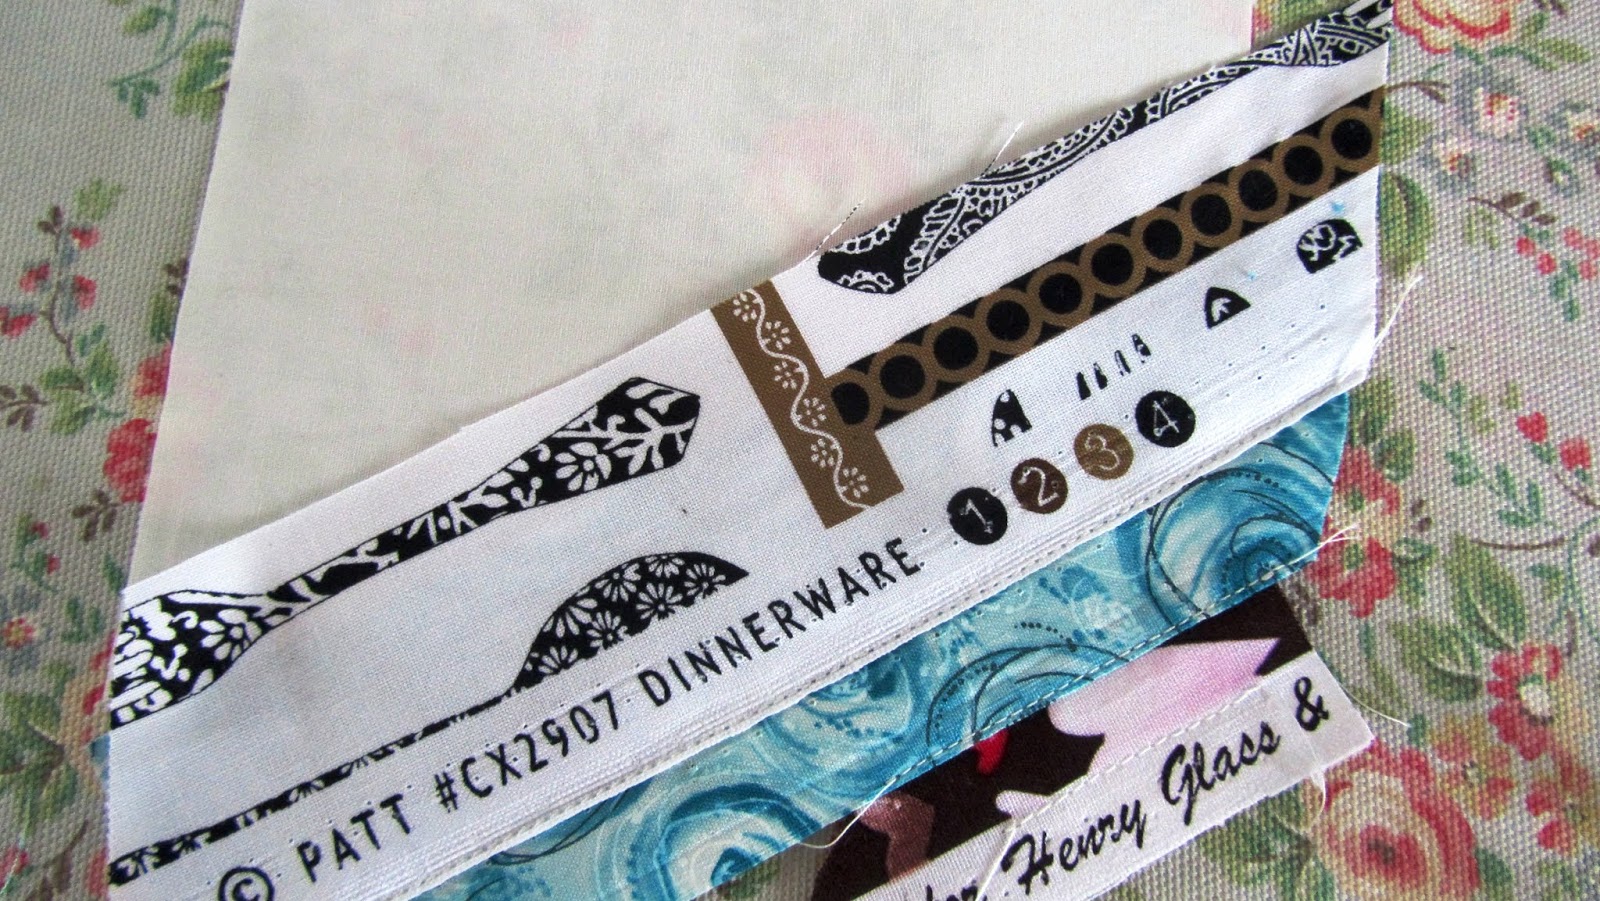
Lay your first piece in one corner.  Sew a straight stitch from edge to edge following the line between the printed edge and the text edge.  Lay your second strip over the top edge of the first by at least 1/4" for the seam allowance.
Sew down the second strip close to the edge.
Be sure to leave at least 1/4" seam allowance underneath.


Sew down the third strip close to the edge leaving as much print as you desire from strip 2.
Flip down and trim away the excess leaving the seam allowance for strip 2.
Continue adding strips until your foundation square is completely covered.  
Now you will trim away the strips hanging off the edges of the foundation square.
Stack the batting, backing and your pieced square together and sew around leaving an opening to turn.  Press and close the open edge.  Quilt as desired.  
I usually edge stitch very close and then follow the diagonal edges to finish. 
Here is the reverse side of the 4 mug mats.
They would make a nice house warming gift or hostess gift.  
 This is my next selvage edge project.  I used mostly modern fabrics and limited color choices.
Happy sewing and enjoy!  :o) 

Wednesday, May 22, 2019

Original S&Q Expo weekend


This beautiful butterfly wall was in the lobby of my hotel near Atlanta.  It shimmered and shined in the sun drenched entry as they are all made from metallic paper and pinned to the wall.
It was just breathtaking.  The hotel associate just smiled as I apologized for taking pictures and she remarked that a lot of people do it and are equally amazed.
Anyway, why was I staying in a hotel?  I went to Atlanta for the Original Sewing & Quilt Expo.  There were a lot of classes I was interested in taking, but ended up with 3 good choices.  My favorite was the Shibori dyeing class taught by Cindy Lohbeck.  https://www.handsonhanddyes.com/about-us.htm  There was a supply fee which ended up being a full kit minus the dyes, but at the end of the class, she let us take some mixed dye home to experiment with along with more fabric pieces.
These two photos show my work.  I am so happy with the outcome.  She was a good teacher and explained the technique quite well.  

The second best class I attended was a paint stick class taught by Laura Murray.  
The paint sticks are oil paints in stick form and you do rubbings over the surface of a textured plate and create all kinds of design possibilities.  You can also use the sticks with stencils.  


If you're interested in attending an Original Sewing & Quilt Expo go to https://www.sewingexpo.com
There were classes over 3 of the days, fashion shows, displays, vendors and lectures as well as daily giveaways and a grand prize giveaway.  It was a fun few days away and now I'm filled with inspiration.

Thursday, May 16, 2019

Tuesday, May 14, 2019

Round Robin Quilting

Today I have been shuffling through my UFO basket trying to see if any of them strike some inspiration in me to get them finished.  None of them are speaking to me at the moment, so I switched gears to looking at photo files from past projects to see the finishes I have done and this round robin is a good example of what I sometimes do to make it more appealing to my eye and preferences.

My quilt group had a sign up for a round robin which is fun to do if you've never done one.  They vary in direction.  Some are row round robins, some are technique rounds, and some are "step" rounds.  This one was what I call a "step" round robin.  To begin there were 5 of us signed up.  We each started with making 2 blocks and providing the fabrics for the next rounds and passed to the next person in a bag.  There were really no instructions except size (wall hanging, in this case) and what comes next like 2 more blocks.  The third person was to add a sashing to join them, the fourth person added a border, and the final person was to add the outer border.  The theme and tone was set by what fabrics you used and/or the choice of fabrics you provided.   You never get to see the progress of your round robin until it's revealed in the end when you've completed a round with each person on the list.  Each round was given ample time to complete (one step a month) and was passed to the next person on a fixed list.  We had to make sure everyone on the list was ready and willing to take the challenge and stick with it, otherwise it can drag out and back log everyone.

This photo shows the completed top when I got it back.
This is beautiful as it is, however to me, I wasn't liking all the white spaces or the half square triangles and the choppy look of the middle sashing.  So, keeping with the Asian theme and combing through my scrap bag, I came up with some options and auditioned them after ripping out the entire middle section and removing the 4 blocks.  
This is what I came up with.  It was completely deconstructed and put back together.  There were only 2 original blocks saved and most of the outer border.  The very center yin yang symbol was created with tread painting.  The other 2 blocks in the center and on the sashing squares were fussy cut from printed fabrics.  The outer border was salvaged for the most part only adding the green corner squares to bring out some of the greens from the center of the quilt.  

In the end, you have to be happy with the resulting quilt.  It will hang in your house or be a gift, so I don't apologize for making changes.  The pieces I didn't use have been used in other things, so they didn't go to waste.  

Now back to my UFO basket.  Making changes or additions will be a good start to the improv top I have buried in the basket.  Have a good sewing day.  :o) 


Tuesday, February 5, 2019

February Begins

February is here and a lot of work is happening in my sewing room/studio.  My DH bought me a Tailor made cabinet which holds my machine and has a fold out extension table.  I love it.  It will help me quilt larger pieces using my home machine.  

I've been working on the National Quilt Museum Block of the Month blocks.  The final block will come out in March. Then, it will be a race to finish it.  I want to clear everything out of the way and just concentrate on this until it is completed.  There will be a label available to all the finishers, however, I am considering making my own.  Here are my blocks so far including this month's on the bottom row center.  Last month's block is to the left and is Hawaiian applique in a sea turtle design.
There is a lot more to prep for this top.  The borders and binding need to be cut and pressed and wrapped onto my binding spool.  Roll out the batting so it can breathe and lay flat before sandwiching.  I also need to apply the embroidery stitching and beading to some of the blocks before sandwiching.  Last night, was a rough and tumble night because I can't decide on the quilting designs.  Maybe each block should be a different design?  My DH loves the pod design I've done, which is an all-over design.  The other thing I need to consider is the thread type and color(s)?
I will be so glad when this one is finished, but I am considering joining in on the next one.  I may wait it out a couple months and just catch up during the summer months.

I finished the Moroccan tile pillow covers but not the Rose petal tile quilt.

I love tiles and take pictures of them whenever I see them.  Well, I love Moroccan tiles and decided to draw out a simple shape onto graph paper.  I used pencil first, then drew over it with sharpie so I can see it for the fusible.
There is something satisfying and relaxing about making your own patterns or templates.  I guess it makes you feel free to create and be in charge of your design.  I drew out #1 piece first, then moved to the right and drew another #1 and so on until I had 4 square.  That left the center blank, so I drew about 1/4" away from the #1's all the way around.  Now you have the #2 piece.  And that's all there is to the pattern.  I drew this onto the paper side of Heat n Bond lite, chose my fabrics which are mostly Kaffe Fassett fabrics. Fuse onto the wrong side of the fabrics chosen, cut around each shape and remove paper.  Be sure to position as accurately as you want them and do your final fuse.  I used Totally Stable tear away for the reverse to stabilize while I stitched around each shape.  In March I will be teaching this technique at my local MQG group.  It is simple and just about everyone has used fusible before.   You could make an entire quilt like this and will need lots more pieces, so I would suggest measuring your design on the graph paper to see how large it is and multiply by how big you are going.  So treat this design as 1 square or block.  When I made the pillow covers, I knew I needed them to measure 25" square, so I cut my background squares and added the fused pieces as I needed them to cover.  You could also work all the way out to the edges and trim off the excess from the edges.
This picture just shows the Rose petal tiles top before sandwiching.  I've just started the quilting on it but will put it away until the BOM is done and out of the way.
Time to get busy.  I will post a picture of my sewing room on a future date.  Have a creative day.  :o)

Tuesday, November 20, 2018

Quilted Ornament Place Mats

For this year's Christmas project, I've made 6 place mats in this ornament shape.  I didn't purchase a commercial pattern, I drew out the circle on paper and used a box shape for the cap on the top.  Searching for my compass was a disaster, and using a pin and string is too involved, so I took the largest plate/platter from my cupboard and drew around it.  I believe it measures 14" in circumference.  The box for the cap is actually an empty straight pin box.
I fused the 3 pieces of the ornament onto thermaweb batting, then sewed on the rick-rack.  I quilted each section with angled lines on the bottoms and meander stitching on the tops. The backs are cut from the pattern shape and using the pillowcase technique, I stitched around leaving an opening for turning.  I pressed the mats, stitched the opening closed and top stitched around the mat.  They will be perfect for our table throughout the season.    


Monday, November 5, 2018

NQM - Blocks 5-8

In an earlier post, I mentioned that I have joined the challenge of the National Quilt Museum of Paducah Kentucky's, Block of the Month program.   Click on this link to join or see the published block projects.  We are to learn techniques each month by making a selected artist's 10.5" block using our own choices and stash of fabrics.

For block #5 (August) they chose the artist, Stephanie Soebbing and the Van Gogh Cherrywood Challenge display at the museum.  She took the play on words, "Up Close with the Stars" display and created a close section of the Starry Night painting.   I created two blocks and chose to go with the one on the right and then added more to it.
I used embroidery stitches to create more movement and look similar to brush strokes.
I also used Inktense sticks to bring out more orange in a few of the stars.   When I quilt this block, I may make more swirls in the darker blue sky areas.  
The next block, #6 for September, was inspired by the youth education program at the Museum. Becky Glasby, the director of education at NQM, chose the Glider block using machine paper piecing technique.  
This is my block.  Please ignore the grey strip on the right for the moment.  


At this point, I had 6 blocks already done and half way through the challenge.  I couldn't stop thinking about how these were going to go together.  Traditional sashing strips and corner stones didn't appeal to me.  I liked a modern look and the 3D effect of some tops I had seen before.  So, I got to work auditioning fabrics for the outer borders and the 3D shadow pieces and came up with this.


So, at this point the first 6 are together.
Block #7 for October was inspired by the exhibit "Color Outside the Lines" at the museum.  The designer, Justin Stafford, chose the watercolor technique for the block design.  I again, made 2 blocks and had to make a decision.

The top one was done using the exact technique as stated.  I didn't like it at all. Using the fusible pellon grid interfacing made it difficult to sew perfectly and it didn't lay flat. It was bulky and didn't measure 10.5" square.  I did the second one using a strip piecing technique and it ironed flat and measured a perfect 10.5" square.  Not to mention the colors used are more pleasing.  The picture shows the sashing added to the square, which I will do from now on so I can get it done faster in the end.  Keeping notes on each block will help me in case there are any questions about what I did in creating each one.  

The Block for November turned out to be another traditional block called "Dutchman's puzzle".  It is inspired by the display of Kansas City Star quilts currently in the museum.  At this point I am hoping the next couple blocks will be contemporary so they will balance together better.  Faith Jones of FreshLemonQuilts.com was the chosen artist for this month. 
These are the colors I chose to go with.
So far I've completed the 8 blocks and have the first 6 together.  


Baskets - Contemporary Vessels

 Baskets to hold all sorts of things and everyday use.  I love them in all shapes and sizes.  Most baskets for everyday use are the common r...